Try to stay crouched throughout parts of this level to maintain stealth. If you want best results, use the
EMP Grenades on the numerous cameras scattered throughout the level to avoid any random guards being placed
around a nearby area, making it more difficult to sneak around without being detected. Remember not to use
any lethal weaponry on the guards and make sure the alarm is not sounded, or else you will fail the mission.
If you play this mission correctly, you will only need to knock out two or three guards in the entire level.
Once the level begins, pull out the Sleeper Dart Gun and shoot a dart at the first person ahead, walking
towards the front desk. Once he drops to the floor, pull out the EMP Grenade and move up the wooden stairs.
Only move up high enough so you can get aim of the first camera next to the security lasers. Throw the grenade
and make sure to detonate it once it reaches the camera. Now that the camera is disabled, a guard from the
second floor will hear the detonation, so run down the stairs and hide behind the pillar at the opposite side
of the stairs until the guard comes down to investigate the body on the floor. During this time, use the
Sleeper Dart Gun to knock out the second guard. Once you have knocked him out, you will need to deactivate
the Security Lasers, so make your way to the left corner on the first floor through the archway into the
second lobby room.
As soon as you enter the next room, disable the second camera mounted on the left wall. Once it is out
of order, crouch and move behind the couch at the middle of the open area. From here, you should disable the
other two cameras ahead. Disable the camera on the left side and then the next one on the opposite
side behind the tree. If you have disabled the four cameras mentioned so far, you will earn the first bond
moment. Most of the time, if you disable one of the two cameras ahead, the guard in the white suit patrolling
the outside back area will run up towards the camera to investigate. If this happens, you can either wait
several seconds behind the couch before he walks back outside to his patrol route, or you can just simply
fire a dart from your position to knock him out. If he is out of range, it is best to wait until he moves out
again and then move towards the entry of the outside area at the back.
Knock out the guard and pick up the Keycard he drops on the floor. Move up to the far right corner of the
small area and press the action button on the Junction Box to deactivate the Security Laser Systems. Doing
this will earn you a bond moment. Straight after deactivating the system, look above towards the second story
of the building and there should be another camera. Pull out a EMP Grenade and disable it. Before you head
back into the lobby area, move towards the liquor cabinet next to the entry and press the action button to reveal
a secret room. Earning yourself a bond moment, you can also obtain some additional Sleeper Dart ammo.
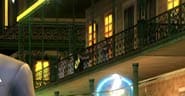
Now that everything has been checked out, go back to the starting room and move up the stairs. Once you get up to
the second floor, continue following the hallway straight ahead until you reach the corner, at which you turn left.
If you move ahead once again after going around the corner, you will end up at the lobby area. Pull out the EMP
Grenades again and disable the camera halfway through the walkway. Repeat this for the camera at the end of
the walkway, just above the door you need to enter to continue the level. Open the door going into the room
and turn left, going through the second opening leading to the outside walkway. Follow the walkway into
the next room and move to the far right side of the room. Press the action button on the Driver's Racing Suit to
finish this rather easy mission.
|
|