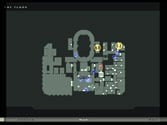
You begin the mission facing a column. You are carrying the
sniper suitcase. Drop it, because we won’t need it at
all. At your starting location is also a Conference ID which
you’ll need to pick up. There is also Diana’s
Letter to your left. With the ID in hand, and the suitcase
on the ground, run forward, toward the hotel.
When you arrive at the front door, the guard in front will
check your ID. When he lets you pass, you’ll have to
walk through a metal detector.
The security personnel won’t fire at you, but they will
remove your weapons. Walk in the door to enter the hotel,
and turn right, to face the reception desk.
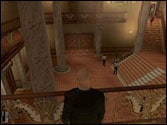
The man will talk to you, have you register, and will give
you a key to your hotel room. Facing the large central staircase,
walk to the door to the left of it.
Make sure no guards are near you or walking toward you, then
pick the lock and go through.
| |
 |
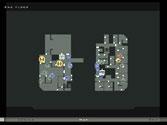
You are in a small hall. Enter the only available door on
the left side of the wall. You will be in a changing room.
Go through the showers, ,
and wait at the next doorway. Peak to the left and you’ll
see a guard.
Get into sneak mode, and sneak around to the right. Do not
let the guard see you, or you’ll be forced to leave
the pool. You’ll see a man in the pool; this is your
first target.
You will want to slowly sneak around to the right. Hide behind
every pillar, and make sure the guard isn’t looking
before continuing. Every so often, he’ll walk to the
left a little, but he never goes further than the middle pillars
(in between the two changing rooms). Your destination is this
doorway.
Before entering the doorway, however, stay behind this pillar
until the man exits the pool. Depending on how you’ve
played, it can take from one to five minutes of real time
for him to leave. The wait may seem long, but it’s best
to kill the man now and get it over with.
After he goes into the room, follow him in sneak mode. He’ll
enter the steam room.
Wait until the door shuts behind him, then activate the red
valve next to the door. This makes the room unbearably hot,
causing the man to die.
Once he’s down, open the door, and pick up the key on
his corpse. Now, leave the pool the same way you came, and
make sure not to alert the guard.
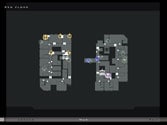
Back in the main hall, take the hallway to the right of the
large staircase.
Enter the elevator (the first door on the left), and ride
it to the second floor. When it arrives, you’ll have
to pass through a metal detector. You’ll be okay. Once
through, open the large door on your left. In this hallway,
you should see a cleaning man.
Follow him until he opens a door, then swipe the Master
Key from the door. Continue down the hall until you reach
a junction.
Take a left, enter the double doors, and walk down the hall,
past the bodyguard. Enter the last door on your right, room
203.
Once inside, open the door that’s in between the two
windows.
You are now outside on a balcony.
Look to your right. We’re going to jump over to the
balcony beside you, but not yet. Wait until a guard comes
out. He’ll look around for twenty or so seconds, then
he’ll go back inside. As soon as he turns around, press
action to get the Hitman jumping.
You should land on his balcony just as the door is shutting.
Enter sneak mode, and open the door. Pull out your Syringe,
and knock out the bodyguard.
Don’t take his clothes. Look at the table, and you will
see several items. You can take them all if you want, otherwise
just grab the silenced pistol. Open the bathroom door.
Your target is taking a shower. Pull out your gun, and shoot
him once in the back of the head.
Leave the bathroom, and grab the bomb case next to the bed.
Drop your gun (so you don’t set off any metal detectors),
and exit back to the balcony, jump over to the one you came
from, and leave the hotel room to the main hall.
 |
|
In the hall, turn left. Run down through the double doors,
then follow the hall to the right. Soon, you will come to
a choice of three doors.
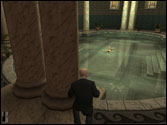
Take the one in the center. You will now be on the balcony
overlooking the ground floor, where the reception desk is.
Run across to the other side, go through either door, and
turn right. You should be facing the U.F. conference room.
Run toward the conference room, hang a right, and go up the
long staircase, through the metal detector at the top. Past
the detector, take a left, and go through the first door on
your left, the one with the green “exit” marker
above it.
You’re outside, on the roof.
Run around the left side of the large white thing, and you’ll
see two windows.
Drop the suitcase, then enter the leftmost window. There is
a guard in here, who will walk from the door to the wall.
When he’s looking at the wall, and walking away from
you, enter the door on the left side of the wall.
You’re in the dentist reception area. Take a right
from the door you just came through, and head to the next
one.
Bring up your map, and watch the guard inside. When his icon
starts moving from left to right, sneak into the room, and
enter the door on the far left, by the window.
Inside this room is the bomb.
Pick it up, and backtrack to the dentist office reception
area, back into the previous room, and out the window, back
onto the roof. When you get on the roof, drop the bomb, pick
up the bomb case, then pick up the bomb again, and the Hitman
will place it in the case.
Now, we make our escape.
From the roof, head back through the door on the opposite
side, into the hotel hallway. Take a right, and go through
the metal detector, down the large set of steps, until you’re
facing the florist.
Take two lefts from the florist, and pass through the metal
detector.
You’re on the main staircase. Take it down, and leave
the hotel through the front doors. Once back outside, pass
through the final metal detector, ,
and hang a left. Take the road all the way down, and when
you reach the end, the mission concludes.
Congratulations, you’ve just beat the seventh mission.
With your Silent Assassin rating, you have unlocked the SG220
.S Dual.
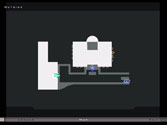
Basement |
1st floor |
2nd floor |
3rd floor |
|