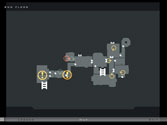
You begin the mission facing the boat you arrived on. Immediately
turn to your left and head toward the brick wall.
You will want to follow the wall toward the house. Stay in
the bushes until you get to the wall, or a guard will spot
you. Follow the wall to a small wooden door leading to the
tennis court.
On the tennis court, run to the little alcove ahead of you.
You will see a guard come from the right path, and he’ll
stop. When he turns around and starts walking away, follow
him. You’ll see a large building, the barn.
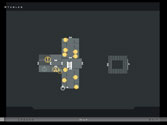
Follow the path to the right, behind the haystacks. Pass the
first door. Keep following the path until you come to a switch
on the wall, which is connected to a satellite.
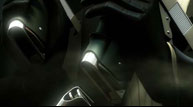
Before throwing the switch, take a peak inside the door. When
the man reaches the bottom of the stairs, throw the switch.
This disables the satellite, causing three guards to come
investigate.
Before they come out, run into the barn, and hide under the
stairs that the man you saw earlier walked down.
You begin the mission facing the boat you arrived on. Immediately
turn to your left and head toward the brick wall.
You will want to follow the wall toward the house. Stay in
the bushes until you get to the wall, or a guard will spot
you. Follow the wall to a small wooden door leading to the
tennis court.
On the tennis court, run to the little alcove ahead of you.
You will see a guard come from the right path, and he’ll
stop. When he turns around and starts walking away, follow
him. You’ll see a large building, the barn.
Follow the path to the right, behind the haystacks. Pass the
first door. Keep following the path until you come to a switch
on the wall, which is connected to a satellite.
Before throwing the switch, take a peak inside the door. When
the man reaches the bottom of the stairs, throw the switch.
This disables the satellite, causing three guards to come
investigate.
Before they come out, run into the barn, and hide under the
stairs that the man you saw earlier walked down.
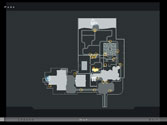
The guards will come from the door on your right. When they
get outside, run into the door they came from, and in the
hall, go through the door to your right. Pick up the key from
the box beside the table.
Leave, and go through the door directly opposite you, and
pick up the canister.
Leave this room, and turn right, back into the room where
you were hiding. Run over to the water, and poison it.
Immediately turn around and run to this spot next to some
hay, and hide.
| |
 |
Hide in this spot until the guards pass and go back into
their room, to resume watching their television. You may also
see the stable boy come running into the room, and run back
upstairs. He’s seen the horses, and he’s pissed,
but don’t worry; he won’t blow your cover. After
the guards leave, follow them, but instead of going in one
of the side rooms, go through the middle door.
In this room, there is a guard patrolling the upper floor,
and if you are standing in the middle when he reaches one
of the sides, you will be spotted. When the coast is clear,
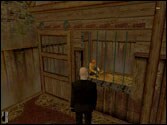
enter the door on the right. You are in one of the stables.
At the far end of the stable, on the right side, you will
spot the person you have to rescue.
Open the stable door to free him. Return to the room with
the patrolling guard. Approach the half-open door, ,
and look outside. When the coast is clear, make a break for
the barn across from you, and run inside, where it’s
safe.
Inside the barn, exit through the back door, and turn right.
Hide by the bushes until the two guards pass from left to
right.
When the guards are moving to the right, run up the path where
they came from, and go through the small door to your left.
You’re now in a small yard. Above you and straight ahead
is an open window. Run to where the window is, and go through
the small opening on the right. Go through the door at the
bottom of the small set of stairs.
You’re now inside the house. Turn left, and you will
see three doors. Enter the one on the left. Approach the furnace,
and disable it.
This will shut the hot water off, causing the woman to get
out of the shower. Run back to where the open window is, and
climb the ladder. .
On the balcony, climb through the window.
You are in a bedroom. Take the vial of poison on the nightstand
(great place to leave poison, huh?), and exit the bedroom.
Enter the door just to the left of you. See this mirror?
It’s actually a hidden door, so go through it. Run up
the stairs, but don’t go through the door yet. You have
two choices of killing this target, both of which will let
you get the Silent Assassin rank.
First choice: Go into the room before the target gets there,
but crouch-walk, or you’ll wake up his wife. Crouch
to the side of the bed (the empty side), and use the vial
in the glass of milk.
Lord Beldingford will come back to bed, drink his milk, lay
down, and never wake up again.
Second choice: Bring up your map, and make sure Lord Beldingford
(the flashing red icon) is in the bedroom. If he is, crouch-walk
over to the bed, and pick up the pillow on the end. Walk over
to the Lord’s head, and use the pillow to smother him.
However you choose to kill him, you’ve got one person
left to kill. Walk through the door at the end of the bedroom.
Open this bookcase, ,
to reveal a passageway. Walk in, climb the ladder, and run
through the room upstairs, and through the wooden door. Go
down the small steps, and through another wooden door. You’ll
be at the top of a spiral staircase going down.
Follow it to the first door, and go through it. Go through
the next door, and you’ll be in the room of a hunting
party guest.
He’s sleeping, so be sure to sneak around. To the right
of the bed is his gun and his clothes; just take his clothes.
Return to the secret passage, and back to the spiral stairs.
Take them down to the bottom, and go through the door.
You are on the first floor. You want the door next to the
cabinet holding the sniper rifle.
Enter the room, and you will see your final target.
Alistair is the man on the left. Make sure the butler isn’t
the room, or that he isn’t approaching the room, and
put a single bullet into Alistair’s head. His guest
is too drunk from the whiskey to notice.
Now that your final target is dead, the last thing to do
is escape from the mansion. To do this, backtrack all the
way to the beginning of the level, where you arrived. Approach
your boat, and as you near it, the mission ends.
Congratulations, you’ve just beat the fourth mission.
With your Silent Assassin rating, you have unlocked the Magnum
500 Dual.
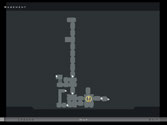
Basement |
1st Floor |
2nd Floor |

3rd Floor |
| |
|
|
|
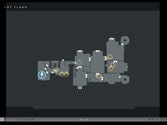
Stables |

Stable Loft |
Park |
|
|