You begin the mission looking out a window of an apartment.
 Turn around, and head to the door with the green “exit”
picture above it.
You will be outside. Run down the metal stairs, and you will
be on the ground. Walk forward until you see a red truck and
a biker on your left.
Turn right here, and follow the road all the way down to the
other end, where you will see a small alleyway on the left,
next to a wooden fence.
Run down this alleyway, and you will see a man, standing by
a poll, smoking.
Sneak up behind him, and use the Syringe on him, then drag
his body back behind the fence. Search him to pick up the
envelop, then change into his clothes. You will
also need to drop both your guns. From where he was standing,
run down the street, staying on the left side, until you reach
a gate.
Walk to the gate so that it will open, and a biker inside
will come frisk you. You’re clean, so he’ll let
you pass. When you see these two doors, ,
go through the one on the right.
Turn around, and head to the door with the green “exit”
picture above it.
You will be outside. Run down the metal stairs, and you will
be on the ground. Walk forward until you see a red truck and
a biker on your left.
Turn right here, and follow the road all the way down to the
other end, where you will see a small alleyway on the left,
next to a wooden fence.
Run down this alleyway, and you will see a man, standing by
a poll, smoking.
Sneak up behind him, and use the Syringe on him, then drag
his body back behind the fence. Search him to pick up the
envelop, then change into his clothes. You will
also need to drop both your guns. From where he was standing,
run down the street, staying on the left side, until you reach
a gate.
Walk to the gate so that it will open, and a biker inside
will come frisk you. You’re clean, so he’ll let
you pass. When you see these two doors, ,
go through the one on the right.
 |
|
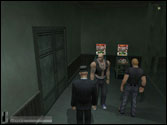
You are now inside the complex. To your left is a reception
desk; go straight through the double doors. You are in a party
room.
Head to the door in the middle of the wall, that’s in
between two flags.
In this room, you’ll see some strippers dancing. Hang
a right, and go through the blue-ish door.
Take a right, walk forward a little, and hang a left into
the bar. Talk to the bartender.
He will go through a door, and come from here.
When he does, he will hand you a keycard, and he’ll
tell you to follow him, so do just that. Be sure to walk,
so that you don’t arouse suspicion. Eventually, he’ll
lead you here, .
A guard will frisk you, then clears you. Enter the door he
is guarding.
You will be in a stairwell.
Follow the bartender up the stairs. He’ll take you right
into Rutgert’s room, then leave. The man will ask you
for the money.
As he goes to the safe to get you the photos, sneak up behind
him. Make sure his back is turned, then pull out your fiber
wire and strangle him. Search his corpse to get the envelop
back, as well as a weapon (which you’ll soon need) and
the safe combination. Open the safe, and take the photos.
Holster the weapon, then go back the way you came, to the
double doors leading to the stairwell.
Instead of stopping at the main floor, though, go all the
way down to the basement.
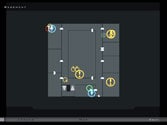
Use your map, or peak around the corners, and make sure nobody
is coming. If the coast is clear, hang a right, follow the
path, and hang another right. You want this door.
Inside, you’ll see a breaker to your left.
Throw it to disable the electricity. Around this time, you
will see a cutscene of your second target being tortured.
Use your map, and make sure there is no guard coming from
the door to your right. When you are clear, run to the very
end of the hall, and enter the last door on your right.
Inside are two corpses; one naked, one wearing a biker uniform.
Snatch the uniform, then leave the room, and run to the door
in the opposite hallway, directly across from you.
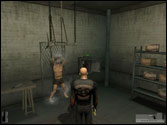
Inside, you will see your target tied to a machine. Wait for
the electricity to come back on (another biker will flick
it on), then flick the switch of the machine next to the target.
Let it run for about twenty seconds, and your target will
collapse, dead.
Now all we have to do is leave.
| |
 |
Head back to the room where you shut off the electricity,
but instead of going in there, go through the door beside
it, which leads outside.
You are behind the garage, and three guards will be roaming
around (or two; one may be inside). If you get the message
that guards are looking for a suspicious reporter, don’t
worry, you’ve ditched that uniform.
Follow the wooden fence on the left side until you get to
a hole in between two dumpsters.
Go through it, and make a left. Run down here until you see
a door with a biker standing next to it.
Go into the door, hang a left, and open the wooden door.
You are in a storage area. Head to the door with the green
exit sign above it, ,
and go through. You are now back outside, facing a truck.
Walk to the right and head behind the truck. As you do so,
your mission comes to an end.
Congratulations, you’ve just beat the fifth mission.
With your Silent Assassin rating, you have unlocked the Sawn
Off Shotgun Dual.
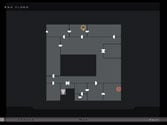
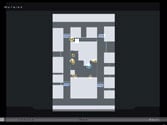
Basement |
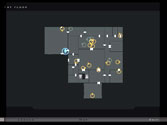
1st Floor |
2nd Floor |
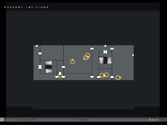
Factory 1st Floor |
| |
|
|
|
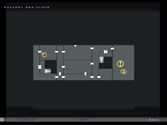
Factory 2nd Floor |
Outside |

Sheds |

Hideout |
|