You begin on a familiar street; yes, we’re back at the
Chinese restaurant where you killed all those Blue Lotus members.
Follow the street that you are facing, and when it splits,
,
go to the right. Follow the road, and when it splits again,
,
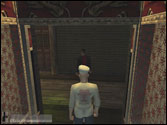
take it to the left. Make your way to the front of the restaurant
(the red building on your right), and go inside.
Once you’re inside, enter this door.
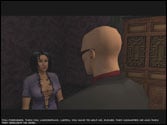
You are now in the bar. Find the bartender on the left side
of the area, ,
and talk to him. His stomach will start bugging him, ,
and after the conversation, he’ll run off. Pick up the
brothel invite from the counter, then go behind it
to find the laxative, which is labeled “Pluto”.
Leave the bar the way you came.
Back in the room with the statue, go straight across and
to the left from the bar. When you see two doors with a guard
in between them, ,
go through the right one, then go through the single door
directly across from you, and you’ll be in the bathroom.
Exit the bathroom through the rear door, turn left, and follow
the hall all the way down, ignoring the two Red Dragons guarding
the door. Enter the last door on your left, ,
and step into the elevator at the end. Ride it to the basement.
 |
|
When you step off the elevator, ,
take the hall to the left, down to the single door at the
end. Go through it. Cross the small room, and enter the one
and only door at the left end of the small room. Inside here
is a cook’s uniform.
Put it on. Exit the room the way you came, return to the main
hall, and go through the metal double doors.
In the small hall, two Red Dragons are guarding the next door,
but dressed as a coke, they’ll let you pass. In the
next room, there is an open door; go through it.
There is a single Red Dragon member in this hall, but don’t
hurt him. Walk by him, and follow the hall until you reach
another metal door with another guard.
Enter it. As you open the door, you’ll be facing another
guard. Go by him, and enter the second door on your right.
This room is holding the agent.
Talk to him, and he’ll reveal the location of the figurine.
Leave the room with the captured agent, and return to the
elevator you used to get down here (not the one at the other
end). Take it back to the first floor. Return to the main
room of the restaurant, by passing through the hallway with
the two Red Dragons, into the bathroom, and out the bathroom’s
main door.
When you’re back in the main room, take a right, ,
through the circular opening, and follow the path to the right,
past another circular opening, to the last door on the right,
guarded by one person.
Go inside, then go inside the double doors immediately in
front of you. You are now in the kitchen.
As you go inside, the cook will tell you to take a soup to
Mr. Hong. Approach the soup, ,
and pour the Laxative into it. The other two cooks won’t
mind; they probably think it’s a spice or some ingredient.
Leave the kitchen, and go into the main dining hall. Remember
that circular dining room where you killed the remaining two
Blue Lotus members? Lee Hong and his bodyguard are in there.
Walk inside, and give Hong the soup. His bodyguard will taste
it, and will take off for the washroom.
Wait for the bodyguard to leave the room, then pull out your
silenced Silverballer and kill Lee Hong. Pick up the safe
combination from him, and drag his body here.
When the bodyguard returns, he won’t see Hong’s
body. Now, we have to get the Jade figurine. Depending on
where the CIA agent said it was located, choose your path.
NOTE: All paths assume you have already killed Lee Hong in
the dining room, and have gotten the same combination from
him.
| |
 |
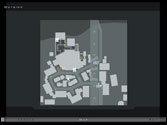
This flashing icon is the safe location.
From where you killed Lee Hong, return all the way to the
storage room that has the elevator (through the bathroom,
down the hall, into the storage room), and ride it to the
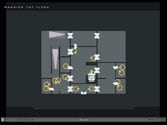
second floor. When you get off, you will see a guard.
Turn left, and you’ll see another guard. Go past the
second guard into the main room. When you get in the room,
,
follow it straight, then turn left. You will see a Red Dragon
member standing by a door. The figurine is inside that door.
Go in (as a cook, you will not be shot at), and open the safe.
There’s the figurine! We’re almost done. Pick
the lock of the other door in this room. If you remember from
a previous mission, this door will lead to a balcony. Head
left, and climb down the ladder. Once on the street, follow
the road to the left, toward the onramp. Once you reach the
onramp, the mission ends.
This flashing icon is the safe location.
Leave the agent’s room, and turn left. The single Red
Dragon member should still be here. Circle around him so that
he can’t keep track of you, and knock him out with the
syringe.
Drag his body into the closest room, then follow the halls
past the agent’s room. You will come to a little sewer
with a piece of concrete going over it, so cross it. At the
other end, guarded by two Red Dragons, is an elevator.
Ride it to the “mansion”. At the top, a Red Dragon’s
back will be to you. Make your way to the left of the guard.
When you see a double door and a single door guarded by a
Red Dragon, ,
take the double doors. Turn to your right, and you will see
stairs leading down. Ignore them, and follow the path to the
left. Soon, you’ll come across a small opening.
Go through it, to the left, and go up the stairs. At the very
top, go through the double doors. Turn right, and you will
see another double door in the middle. Your objective lies
beyond. Right next to the door you came in from is the safe;
open it to get the figurine.
To get out of here, return to the first floor of the mansion,
ride the elevator back to the basement, run to the other end
of the basement, take the elevator back to the first floor
of the restaurant, exit through the front doors, and run down
the road to your left, toward the onramp. Mission over.
| |
 |
This flashing icon is the safe location.
The brothel isn’t too hard, but not the easiest either.
Leave the agent’s room, turn left, and return to the
room where you changed clothes. Put on your original clothes
(the black suit you started the mission with). Once in your
original suit, return to the elevator, and take it back to
the first floor. When the elevator stops, get off, and return
to the main room, the one with the weird sculpture in the
middle (the room next to the restaurant exit). Go to the door
with two guards that’s bathed in a red-ish light, ,
and one of the guards will stop you. He’ll see your
pass, ,
then one of them will escort you to the brothel. Follow him.
When you get to the bridge, ,
the guard will stop. Cross the bridge into the brothel. Walk
past the two Red Dragons and the Madam, and take a left at
the curtain. Talk to the woman here.
She’ll tell you to follow her, so do that. She’ll
lead you into a room, then talk to you again.
We don’t want to kill her and risk our SA rank, so get
behind her and knock her out with the syringe. Open the other
door in this room, and you’ll be outside.
Follow the walkway to the end, around to the left, and around
to the other side. Go through the one and only door.
Inside is your figurine.
To leave the restaurant, return across the bridge to where
the guard stopped leading you, follow the stairs back to the
storage room, into the main hall, and out the main door, back
to the street, where you will follow the road to the onramp.
As you reach the onramp, the mission comes to a close.
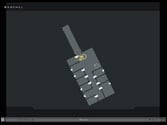
This flashing icon is the safe location.
If this is the location of the figurine for you, it’s
the easiest one in the game. Leave the agent’s room,
turn left, and go through the metal door. The depot is through
a small metal door, right next to the elevator.
Go inside, turn left, and enter this door.
Look to the right, and there’s the safe!
To leave, simply return to the elevator, take it to the first
floor, leave the restaurant through the main door, and follow
the road to the left, all the way to the onramp. When you
reach the onramp, you’ve completed yet another mission.
Congratulations, you’ve just beat the eleventh mission.
With your Silent Assassin rating, you have unlocked the Micro
Uzi’s Silenced. Only one more mission to go!
Outside |
Brothel |
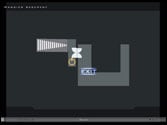
Mansion Basement |
Mansion 1st Floor |
| |
|
|
|
Mansion 2nd Floor |
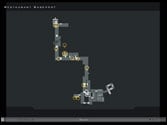
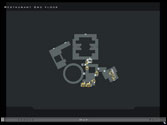
Restaurant Basement |
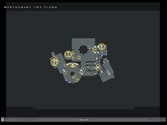
Restaurant 1st Floor |
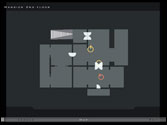
Restaurant 2nd Floor |
|