| WALKTHROUGH - CHAPTER 02, INTENSIVE CARE Objective Added:
[ ] Retrieve the Captain's RIG
The captain's body made it down to the morgue, probably before the ship was
totally compromised. Nicole worked on this deck. Maybe I can find
something... anything showing that she's still alive.
Step out of the tram and walk toward the female crew member up ahead. There is
a !!STORE!! off to the left. The woman will hand over the ++KINESIS MODULE++
before she plummets to the floor. You can use the R2 (or RB) button while
standing over her to check for signs of life or simply to make sure that she is
dead. It appears so... or, well, now at least.
The --KINESIS MODULE-- database will be received after Isaac picks up the
module. This handy little device will allow Isaac to grapple onto objects by
aiming and pressing O (or B). Collect the --SMALL MED PACK-- from near the
body bags in the sitting area then use the kinesis module to move the metal
crates that are blocking the hall ahead. Grapple them by aiming at them then
tap O (or B) and move them toward the tram. Press the R1 (or RT) button to
launch them. The kinesis module has some really good grappling range by
default but it can also be upgraded at an Upgrade Bench.
Objects that are grappled with the kinesis module can be fired at enemies to
damage them. Normal objects don't really do that much damage but certain blade
objects that can be found around the game will actually cut off appendages.
Whenever a fan (vent) is found along the side of a wall or ceiling it can be
destroyed with weapon fire and the fan blade from inside can be picked up with
kinesis and shot at an enemy to cut off an appendage. Items can also be
grappled and brought to Isaac through the use of kinesis, which will come in
handy for a few item pickups spread throughout the game.
The --SCHEMATICS-- database file will appear as you walk toward the
--FLAMETHROWER SCHEMATIC--. Schematics are held in Isaac's inventory when they
are picked up and they will automatically be used at a Store to add the
corresponding weapon or item to the store list - there is a Store in the next
room, so you don't have to backtrack to the previous one.
ITEM LIST
[ ] ++KINESIS MODULE++
[ ] --"Kinesis Module" database file--
[ ] Small Med
Pack
[ ] --"Schematic" database file--
[ ] Flamethrower Schematic
Objective Added
[ ] Find the Thermite
There's some thermite stored near the Main Lab. A small amount of that,
plus a timed electrical charge, and I should be able to blow through that
barricade.
[ ] Find the Shock Pad
A portable defibrillator should provide enough juice to detonate the
thermite. There's one in Zero-G Therapy, according to Hammond.
The --DESTROY THE BARRICADE-- database file will play as Isaac enters the
Security Station. Pick up the --3000 CREDITS-- from the floor along with the
--RANDOM AMMO-- from the group of body bags against the back right wall. There
is also an --ITEM BOX-- and an --ITEM LOCKER-- to the side. Save your game at
the !!SAVE STATION!! and use the !!STORE!! if needed then open the door
directly ahead.
ITEM LIST
[ ] --"Destroy the Barricade" database file--
[ ] 3000 Credits
[ ] Item Box,
[ ] Item Locker
[ ] Random Ammo
The --SECONDARY FIRE-- database file will appear as Isaac enters the hall.
There is some --RANDOM AMMO-- among the left set of body bags down the hall.
Recharge your stasis at the stasis recharger if needed then shoot the slamming
door up ahead with stasis to slow it down and then move by it. Open the next
door to enter the lab.
ITEM LIST
[ ] --"Secondary Fire" database file--
[ ] Random Ammo
An --ITEM CONTAINER-- is to the left and some --RANDOM AMMO-- is around the
left side of the wall up ahead. As you move further into the room, the doors
will seal off as the area quarantines itself. A total of four Slashers will
attack. Put your back to a wall, preferably a corner and shoot them. You
might want to use stasis. Don't stand near the entrance door since a Slasher
will bust through the vent on the left side after the first three are defeated. 
ITEM LIST
[ ] Item Container
[ ] Random Ammo
The area will still be under quarantine for the time being, which means there
is still something in here! Rush over to the lift on the far side of the room
and use the controls to take it down. A crawling Slasher will attack from off
to the right as Isaac steps off the lift. Once you move into the middle of the
room four Slashers will attack - one of them moves out of vent from near the
elevator, so watch for him if you run back there. The quarantine will be
lifted once the Slashers are finished.
Don't worry about the surrounding unlocked rooms just yet. Use the stasis
recharger on the first left column across from the elevator if needed. Run to
the end of the right hallway further ahead then grab the two --RANDOM AMMO--
pickups and the --MERCER'S JOURNAL-- database file as you move along the hall.
Return to the middle portion of the area.
ITEM LIST
[ ] Random Ammo
[ ] Random Ammo
[ ] --"Mercer's Journal" database file--
Enter the room directly across from the elevator and pick up the
--RANDOM AMMO-- and --KYNE AND THE CAPTAIN-- database file from inside. Turn
your attention to the bookcase and grapple it with the kinesis module then move
it to the left. Step into the hidden room behind the bookcase then open the
--ITEM LOCKERS-- to the right and pick up the --GOLD SEMICONDUCTOR-- and the
--MARKER OVERVIEW-- database file. Leave the room.
ITEM LIST
[ ] Random Ammo
[ ] --"Kyne and the Captain" database file--
[ ] Item Locker,
[ ] Item Locker
[ ] Gold Semiconductor,
[ ] --"Marker Overview" database file--
Enter the room off to the right up ahead and smash the --ITEM BOX-- then raid
the --ITEM LOCKERS-- and step back outside. Open the door near the lift.
Collect the items from the --ITEM LOCKERS-- then save your game at the !!SAVE
STATION!!. Open the next door to enter the Bio Lab.
ITEM LIST
[ ] Item Box
[ ] Item Locker
[ ] Item Locker
[ ] Item Locker
[ ] Item
Locker
[ ] Item Locker
Walk down the hall and the lights will begin to change color. A researcher
will appear behind the glass window up ahead. Some sort of creature will kill
him from the other side. Take the --RANDOM AMMO-- from the right corner near
the window.
Yep, we have to go in that room! Walk around the left corner then open the
door to the room. It's so quiet now. Walk further into the room and a Lurker
will appear. These small enemies are actually infant necromorphs but they are
really more annoying than Slashers. The quickest way to defeat them is to
shoot their three appendages right before they attack. Shoot off a few or all
three appendages to highly damage them. The Plasma Cutter can easily defeat
them but the Line Gun can do some serious damage to multiple appendages. They
have a close range lunge and you'll have to tap the X (or A) button to escape
from it.
The Flamethrower is one of the best weapons to use against a Lurker when they
are fought in groups with no other enemies around. Wait for their tentacle
appendages to move out of their back then shoot them with the Flamethrower's
secondary fire flame burst and this will set them on fire and burn all three
appendages at once. Allow the flames to burn one of them then shoot it again
shortly before the flames extinguish.
Smash the --ITEM BOX-- after the fight then pick up the --RANDOM AMMO-- from
around the side of the right desk. Use the lift to reach the top walkway. Two
more Lurkers will attack on the top walkway. There is a --RANDOM AMMO-- pickup
behind the first set of water tanks to the left. Go through the door up ahead
followed by the next door.
ITEM LIST
[ ] Random Ammo
[ ] Random Ammo
[ ] Random Ammo
[ ] Item Box
Pick up the two --RANDOM AMMO-- pickups along with the --POWER NODE-- from the
container along the wall up ahead. Pick up the ++THERMITE++ to fulfill the
first objective.
Objective Complete:
[X] Find the Thermite
The --"FOUND THE THERMITE"-- database file will play after colleting the
thermite. Open the door directly ahead. Go through the next door that leads
back out to the lab. Use stasis to hold the slamming door then move back to
the hallway behind it. If you need a stasis recharge then return to the bottom
floor via the elevator and there is a stasis recharger on the first left column
in the area below.
Two Slashers will attack from the top of the ramp behind the slamming door.
Use stasis to help you out in fighting them since there is a stasis recharger
on the wall across from the slamming door anyway. Enter the Security Station
once again.
ITEM LIST
[ ] Random Ammo
[ ] Random Ammo
[ ] Power Node
[ ] ++THERMITE++,
[ ] --"Found the Thermite" database file--
Enter the next door to the side. We still need to find the Shock Pad.
The lights will go off as Isaac moves around the corner up ahead. A person is
up ahead - what in the world is he doing? Ah, only headbanging to some sweet
tunes, no doubt. Grab the --RANDOM AMMO-- then recharge your stasis at the
stasis recharger if needed.
ITEM LIST
[ ] Random Ammo
A Stinger will quickly move by the railing up ahead but it won't attack.
Collect the --INTERESTING RESULTS-- database file from in front of the railing
and use the !!UPGRADE BENCH!! If needed. The room to the left can be opened if
you examine the controls to the right of it and use one Power Node on it.
ITEM LIST
[ ] --"Interesting Results" database file--
Open the --ITEM LOCKERS-- then pick up the --GOLD SEMICONDUCTOR-- and the
--MERCER AND KYNE-- database file.
ITEM LIST
[ ] Item Locker
[ ] Item Locker
[ ] Gold Semiconductor
[ ] --"Mercer and
Kyne" database file--
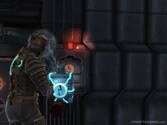
Move up the ramp to the right to receive the --KINESIS SYMBOL-- database file.
Basically, any object that has the blue and white overhead symbol displayed on
the big cylinder with the overhead platform up ahead can be grappled and
dragged with the kinesis module. Grapple the cylinder with the overhead
platform using your kinesis module then drag it all the way to the left, as far
as it can go. You'll need to step back down the ramp to drag it.
Run across the ramp and prepare to fight off the two Stingers that appear on
the other side. Open the door to the room along the left side of the next
area. The person on the floor will break out in convulsions then eventually
die when Isaac walks around the side of the table - Isaac has that effect on
people, I suppose. Pick up the --POWER NODE--, --RANDOM AMMO-- and the --PULSE
ROUNDS SCHEMATIC-- from inside the room. A Slasher will bust through a vent
and attack from the side near the door after some of the items are collected.
Leave the room.
| |
 |
Use kinesis to pick up the glowing power unit (oval shaped lit up object)
outside of the room then place it into the red glowing plug area (the hole next
to the lift) and let go of it. The power unit will not fit all the way inside,
so don't fiddle too much with it or it won't fit right. The best way to plug
these in is to simply walk toward the plug with the power unit in front of
Isaac then release it once it is just about all the way in. Take the lift to
the second floor.
ITEM LIST
[ ] --"Kinesis Symbol" database file--
[ ] Random Ammo
[ ] Power Node,
[ ] Pulse Rounds Schematic
Walk toward the gap up ahead. If the platform is not over the gap then use
kinesis to move it over the gap then cross it. A Stinger will move out of a
vent along the wall up ahead then a Slasher will attack from the right. Use
stasis if needed since there is a stasis recharger on the right wall up ahead.
Move around the corner then use kinesis to slide the platform over the gap
directly ahead on the other side.
Use the !!SAVE STATION!! on the left wall to save your game. Walk over to the
purple fuse box on the right side of the locked door and attack it to unlock
the door. A simple stomp will destroy it since it is low. Open the door and
continue into the next room and open the next door after that.
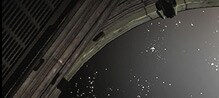
Isaac will enter a vacuum area. These areas have no air, so Isaac's oxygen
meter will appear. The --AIR TIMER-- database file will appear once Isaac
moves ahead. Cancel it quickly since you need to get through this area fast
before the oxygen gauge is depleted. These areas have only dull sounds, so
enemies can sneak up on you easily in a vacuum area, but there are no enemies
in this particular hull breach.
When Isaac reaches the first section without wall, look off to the right and
grapple the --LINE RACKS-- floating out in space to bring them toward Isaac
then collect them. Run to the left and open the three --ITEM LOCKERS-- along
the way. While standing near the door on the other side, move against the side
without wall and look to the right past the door to see a blinking item very
far off in the distance - grapple these --10000 CREDITS-- and collect them.
Quickly get to the door on the other side and open it. Move into the room and
the door will seal off behind Isaac then oxygen will fill the room again.
Isaac's oxygen gauge will automatically recharge every time that he enters an
area with air.
ITEM LIST
[ ] --"Air Timer" database file--
[ ] Line Racks
[ ] Item Locker
[ ] Item
Locker
[ ] Item Locker
[ ] 10000 Credits
The --SHIP GRAVITY-- database file will play once Isaac steps further into this
hallway. Open the next door.
ITEM LIST
[ ] --"Ship Gravity" database file--
Use the console to deactivate the gravity in the room. This area is your first
introduction to a zero gravity room. The --ZERO-G MOVEMENT-- database file
will be received after deactivating the gravity. Isaac can step on just about
any surface (walls and ceilings) in rooms with zero gravity. To move from one
surface to the other, hold the L1 (or LT) button to aim then move the cursor
over a desired area and tap the /\ (or Y) button to jump to that surface - this
is known as a "Zero-G jump". If Isaac can't jump to a surface then the ammo
gauge on his gun will flash red.
 |
|
| |
|
If you look around the room well enough, then you'll spot an --ITEM BOX--
floating in the center area along with the red explosive canisters. Use
kinesis to grab the item box then smash it against the floor by pointing it
toward the floor and firing it with R1 (or RT). Move along the walls then hop
over to the walkway on the other side. Grapple the nearby power unit then
place it into the power plug on the right wall while on the other side and this
will unlock the door on that side.
ITEM LIST
[ ] --"Zero-G Movement" database file--
[ ] Item Box
Open the --ITEM CONTAINER-- and --ITEM LOCKER-- then pick up the --1000
CREDITS-- near the door and the ++SHOCK PAD++ on the table to the side. The
--FOUND THE SHOCK PAD-- database file will play after picking up the Shock Pad.
ITEM LIST
[ ] 1000 Credits
[ ] Item Container
[ ] Item Locker
[ ] ++SHOCK PAD++,
[ ] --"Found the Shock Pad" database file--
Objecting Complete:
[X] Find the Shock Pad
Objective Added:
[ ] Destroy the Barricade
Once I've put together an explosive, I can blow up the barricade. Then I
need to make my way through the Emergency wing and find the Morgue.
Reenter the zero gravity room.
Two Stingers will attack in this room this time. Jump off of the current
platform to gain some more space for fighting them. Grapple a red explosive
canister with kinesis and launch it at them. They like to perform a prolonged
lunge in zero gravity, so move away when you see them flying toward Isaac.
Leave the room by opening the door on the other side and stepping through then
continue to the vacuum area.
This area can be a little unnerving on your first time through. A Slasher will
attack further ahead. Shoot him like you normally would. Notice how there is
practically no noise when shooting or confronting an enemy in a vacuum - it
really builds tension for these areas! Silent death! There is only one
Slasher outside, so run to the other end and open the door. Another Slasher
will attack in the next room while the vacuum is still active, so shoot him
quickly.
Be sure to save your game again at the save station further ahead then return
to the Security Station once again. Use kinesis to pull the platform over to
the other side when you go to cross the gap along that side. A Slasher will
bust out of the vent near the lift and a Stinger will attack once Isaac moves
down the lift. Don't be afraid to use stasis since a charger is in the next
room on the way back.
A new enemy - Spiders - will attack in this hallway. Take out your pulse rifle
and shoot them while they are gathered. The flamethrower works well also. You
need some sort of weapon with a spreading ammo (Force Gun, Contact Beam) to
fight off these enemies better - sadly, you don't have this right now. If they
jump on Isaac then mash the X (or A) button to knock them off and destroy them.
They can take quite a bit of health from Isaac in groups, so don't let them get
on him when they are packed. Recharge your stasis at the stasis recharger then
return to the Security Station.
Now that Isaac is back in the Security Station, walk over to the barricade on
the other side of the room and choose to place the thermite bomb on it to
destroy it.
Objective Complete:
[X] Destroy the Barricade
The --BARRICADE DESTROYED-- database file will be received when walking toward
the door that was behind the barricade and a new objective will be added.
ITEM LIST
[ ] --"Barricade Destroyed" database file--
Objective Added:
[ ] Retrieve the Captain's RIG
The captain's body made it down to the morgue, probably before the ship was
totally comprised. Nicole worked on this deck. Maybe I can find
something... anything showing that she's still alive.
Open the door on the other side of the barricade.
Pick up the --NICOLE'S REPORT-- database file from the floor up ahead then the
--WE'LL FIND HER-- database file will play right after viewing the report.
Continue around the corner of the hall ahead then open the next door.
ITEM LIST
[ ] --"Nicole's Report" database file
[ ] --"We'll Find Her" database file--
Smash the single --ITEM BOX-- on the left side of the Clinic then open the next
door to the right.
ITEM LIST
[ ] Item Box
Two Lurkers are in the area, so take out the flamethrower and light up this
dark room with carnage! Wait for them to showcase their appendages then shoot
them with a flame burst secondary fire.
Move directly ahead then pick up the --LINE RACKS-- from near the first bed to
the right. An --ITEM BOX-- is between some beds up ahead and --1000 CREDITS--
is near the far wall. There is a --RANDOM AMMO-- pickup below the drip stands
that are near the power unit on the side of the room. Go ahead and pick up the
power unit with kinesis and place it in the power plug to unlock the door up
ahead. There is a stasis recharger on the left side of this room. Don't go
through the door just yet. Enter the open room across from the door then open
the --ITEM LOCKERS-- inside then exit the room through the newly unlocked door.
ITEM LIST
[ ] Line Racks
[ ] Item Box
[ ] 1000 Credits
[ ] Random Ammo
[ ] Item
Locker
[ ] Item Locker
When Isaac enters this room, a Lurker will run to the right down the corridor
up ahead. Soon the Lurker will step back out and a Slasher will join him as
both dash toward Isaac. Defeat them, then turn your attention to the locked
door to the right. Place a Power Node in the controls to the right of it to
unlock the door then step inside.
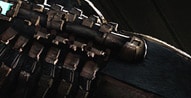
Grab the many --RANDOM AMMO-- pickups and the --LINE RACKS SCHEMTIC-- then
smash the --ITEM BOX-- and raid the --ITEM LOCKERS--.
ITEM LIST
[ ] Random Ammo
[ ] Random Ammo
[ ] Random Ammo
[ ] Random Ammo
[ ] Item
Box
[ ] Item Locker
[ ] Line Racks Schematic
Back out in the hallway, continue to the right. Further ahead, some Slashers
and a Stinger will attack. One of the Slashers will appear from behind Isaac,
so watch for him.
Pick up the --EILEEN-- database file from the floor to the left of the next
door up ahead. Don't go through the door just yet, move down the hall to the
right. Two Slashers and a Stinger will try to corner Isaac, so run toward a
wall and make sure that all the enemies are in view while fighting them. Pick
up the --NEWBORNS-- database file from off the floor then grab the --LINE
RACKS-- on the nearby table and smash the --ITEM BOXES-- on the far wall.
Return to the door back down the hall and step into the next room.
ITEM LIST
[ ] --"Eileen" database file--
[ ] Item Box
[ ] Item Box
[ ] Line Racks,
[ ] --"Newborns" database file--
Oh look, a survivor! Mam, could you spare some extra ammo, please? Wow, she
doesn't look so well armed with that knife and psychotic stare. Don't worry
about her though, pick up the --MORE TIME-- database file and get yourself to
the next room instead.
ITEM LIST
[ ] --"More Time" database file--
Nice atmosphere in here, isn't it? Pick up the --COLONIST PROBLEMS-- file from
the floor shortly after entering then get to the next door. A Lurker will step
out from the corner at the end of the hall, so light him up with some flames or
cut off those appendages of his. Take the elevator down to the next floor then
step inside the Morgue.
ITEM LIST
[ ] --"Colonist Problems" database file--
Oh, how I do love my Morgue rooms in survival horrors - seemingly quiet and
ready to scare the hell out of me at any moment without notice! Move around
the left side of the room. One of the doors to the shelves along the side will
open eventually. Don't worry... yet.
Move further ahead and a new enemy will appear from behind the window in the
room up ahead. These are Infectors and they can infect any dead bodies around
them. This is why you won't to mutilate any dead bodies in areas that an
Infector will appear in, so they can't turn them into a necromorph. The
Infector will infect the captain's body then the captain will turn into a Dark
Lurker.
Objective Added:
[ ] Kill the Captain
The captain's body has been... transformed by one of those things. I've
got to take him down to get his RIG.
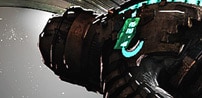
Dark Lurkers are a bit more powerful and aggressive when compared to the
standard Lurker, so have the Line Gun ready for him when he charges through the
glass toward Isaac. You need to finish him and immediately turn your attention
toward the Infector. The Infector will rush toward the dead body to the right
and attempt to turn it into Slasher, so you need to tear through the captain
then buckle down on the Infector with a weapon before he has a chance to infect
the dead body off to the right. The Line Gun should work just fine for both
enemies. You might want to use stasis on the Dark Lurker so you can focus on
the Infector. Infectors don't have any appendages, so there is nothing special
to aim for on their bodies.
Infectors cannot infect a dead body with only a few appendages still left on
it. And before you ask, yes, they can still infect a headless body! Even
though they stick their infecting appendages through the corpse's head, they
will actually place it into the corpse's neck if the head is missing.
Objective Complete:
[X] Kill the Captain
Pick up the ++CAPTAIN'S RIG++ from the captain's corpse and the current
objective will be complete then the --CODES RECEIVED-- database file will play.
ITEM LIST
[ ] ++CAPTAIN'S RIG++
[ ] --"Codes Received" database file--
Objective Complete:
[X] Retrieve the Captain's RIG
Pick up the --1000 CREDITS-- from the open door along the side wall then find
the --1000 CREDITS--, --SMALL MED PACK-- and --POWER NODE-- in the room where
the captain's body was. Step back out into the Morgue then grab the --AUTOPSY
REPORT-- database file and the --RANDOM AMMO-- while on your way to the
elevator doors on the right side of the room. Take the elevator back up to the
next floor.
ITEM LIST
[ ] 1000 Credits
[ ] --"Autopsy Report" database file--
[ ] Random Ammo,
[ ] Power Node
[ ] Small Med Pack
[ ] 1000 Credits
Don't worry, nothing will jump out at you in here. Return to the Clinic
Hallway - you start right across from the door leading to it.
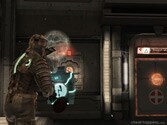
Right when the door is opened to this room, a Dark Lurker will immediately dash
toward Isaac, so answer his aggression with a Line Gun or Pulse Rifle to the
face to calm him down a bit. Such anger. If you are at aiming and have a
quick response to fast enemies then a Dark Lurker can easily be taken down with
the Plasma Cutter. Aim at its legs then shoot one of them off and then fire at
his arms and head as he moves toward Isaac. It's good to learn to fight them
off this way in order to save ammo.
The --ENGINE PROBLEMS-- database file will play shortly.
ITEM LIST
[ ] --"Engine Problems" database file--
Objective Added:
[ ] Go to Engineering
So the infection started planetside, and somehow got onto the ship. And
these creatures came from within the planet. It's almost too incredible to
believe. Hammond needs me on the Engineering deck now to try to connect
the ship's orbit. As if things could get any worse.
Alright Mr. Clarke, head through the doors directly ahead then step back into
the Tram Station from the Security Room.
Step onto the tram and interact with the controls to complete this chapter.
|