|
WALKTHROUGH - WEST AFRICA
"The coordinates Zip provided are deep in the Ghana
rainforest. I don't know what Rutland is after, but I'm sure
he keeps that articfact close to him. I'll have to convince
him to part with it."
Run down the path ahead and walk toward the waterfall for
a cutscene.  Step to the edge, after the cutscene, and do a swan dive (forward
+ jump then crouch) into the water below. Swim to the right
and you'll find a
right next to a rock structure near the bottom. Swim over
to the left of where you first landed to find another
under the second waterfall to the left. You may have noticed
a Silver Reward underneath the middle strip of land up ahead
as well, but you cannot get to it yet since a current from
the waterfall up ahead will push you back. Pull yourself up
to the middle strip of land.
Step to the edge, after the cutscene, and do a swan dive (forward
+ jump then crouch) into the water below. Swim to the right
and you'll find a
right next to a rock structure near the bottom. Swim over
to the left of where you first landed to find another
under the second waterfall to the left. You may have noticed
a Silver Reward underneath the middle strip of land up ahead
as well, but you cannot get to it yet since a current from
the waterfall up ahead will push you back. Pull yourself up
to the middle strip of land.
-- CHECKPOINT --
Climb along the platform on the right edge and jump to the
rope
to unlatch the drawbridge up ahead. Quickly walk toward the
drawbridge and grapple the shiny metal piece on the side then
tug the grapple to pull the drawbridge down. If you're not
quick enough the latch will lock back into place. The waterfall
up ahead will part and the drawbridge will lower to let you
enter the temple.
Jump back into the lake and retrieve the from under the strip of land since the
current from the waterfall will no longer stop you. Swim back
up and walk into the temple entrance.
-- CHECKPOINT --
When you reach the running water, look up ahead to see a
shiny metal raft.
Grapple the raft and pull it toward you. Jump to the first
rope then swing
and jump to the next to get to the other side. Walk up the
steps on the other side and a mercenary will be walking down
the hall in the back. Shoot him
and run past the broken traps up ahead. Jump over the first
trap. Further ahead you'll step on a pressure switch that
will open the door up ahead. Run toward the door and jump
over the first trap and roll under the third trap to reach
the door before it closes.
The mercenaries inside the big room ahead will not notice
you as you enter, but if you step around the crates they will
see you. Shoot the explosive barrel on their side to destroy
the front of the second floor and kill a few in the process.
Shoot them with your handguns
and be sure to get rid of the ones on the top before any of
them go for the chain gun. A few more mercenaries will enter
the room eventually from the side you came in from. Shoot
the explosive barrel on that side to get rid of at least one
of them.
-- CHECKPOINT --
|
|
Use your binoculars and look toward the right wheel to see
a column leaning against it. We've got to find a way to move
that column. Walk over to the remains of the right stairs
and use the platform up above to pull yourself up then grab
the .
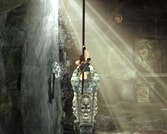
Turn around toward the chain gun up ahead and look to the
left of it to see a piece of the second floor that stretches
out toward a rope. Jump on the rope
and swing directly into the standing column
up ahead under the light. The column will fall and hit the
wheel, which will cause the other column on the wheel to break.
The traps on the left side will now start to work. Use the
rope to swing and grab a pole attached to the moving wheel.
While on a pole keep swinging until the wheel starts to move
upwards then swing to the next rope across from you. If you
fall, then grab a pole by jumping from either side of the
wheel. Swing to platform on the other side. Look in the back
to see a shiny metal lift. Grapple the lift and pull it toward
you.
While on the lift, grapple the shiny rock attached to the
platform on the other side and use it to pull you
and the lift over to it. Jump to the platform with the rock.
The area through the doorway cannot be entered until the traps
are moving on that side once again.
Jump to the rope
across from the platform and pull yourself up just a bit.
You need to swing to the nearest top pole on the wheel. Swing
across to the next pole from the first then jump and grab
the stone ladder across from the pole. Climb up the ladder
then turn around and climb the next ladder. When you reach
the broken part of the ladder, jump and grab the crevice to
the left. Move to the left then jump and grab the crevice
up above. Move to the left some more then line yourself up
with the metal ladder overhead and jump to it. Climb it to
the top.
-- CHECKPOINT --
Run toward the empty channel ahead, but don't fall off the
edge just yet. Look below you to spot a leopard. Shoot the
leopard from high then fall down. You can't do anything with
the raft for the moment unless you want to drag it across
the rock floor. Turn to the right upon falling and climb the
broken stairs to the side. Move to the other side to find
a
next to the side of the wall near some grass. Climb the debris
to the side then jump to the top of the platform to see a
block attached to rope up ahead. Jump to grab the block then
pull yourself up. Lara's weight will bring down the current
block and lift the other block across from you. You'll also
see a stone ladder in the back of the second block. Wait for
the second block to rise up near the ladder then jump and
grab it. Pull yourself up then jump and grab the ladder
and climb it.
-- CHECKPOINT --
| |
 |
A cutscene will play that will show you a pool of water below.
You can dive off from this area and land directly into the
water, which I would recommend doing on time trial, but we're
going to do it the normal way. Move over to column across
from you to see a crevice on the side of it. Jump to the crevice
then move around the right side. Fall and grab the crevice
below you then move to the left and jump to the next crevice
on the left. Fall down one more crevice then fall to the floor
below. Go ahead and jump into the water and swim through the
opening to the left. Swim to the left side and pull yourself
up. Jump up one more platform and you'll see a
behind some debris off to the right. Jump back into the water
and swim back to the raft. Get on the raft and grapple [236]
the shiny metal on the pole in the back and pull yourself
over to it. The raft will turn to the side and automatically
start to move through the opening on the left. Grapple the
next pole with the shiny metal ahead and pull yourself over
to it. Jump to the area that it takes you to then climb the
stone ladder
off to the left. At the top, jump to the suspended block behind
Lara.
Wait for the other block to rise a bit past the current block
then jump and grab the next one. From the second block, jump
and grab the platform up ahead.
-- CHECKPOINT --
Move up ahead and look behind the column on the left to find
a . Look directly
up while next to the column to see a shiny metal piece
up above you. Jump then grapple to the piece and swing across
to the next platform. Walk up ahead on the platform then jump
and grab the crevice on the column in front of you. Shimmy
around
the right side then fall to the crevice below you. Shimmy
to the right some more and jump to grab the crevice above.
Jump to the crevice directly across from you
and Lara will turn
in midair to grab the leftmost side of the crevice - she loves
to scare us like that. Move to the right just a bit then fall
and grab the crevice on the wall below. Shimmy to the right
then jump to the right to leap across the break in the crevice
and grab the other side. Move to the right some more then
jump and grab the overhead crevice. Shimmy to the right and
jump to grab the side of the platform to the side.
-- CHECKPOINT --
Step on the pressure button
to the side to cause the rock platform on the side to rotate
and release the heavy box. That box will be your way back
up to this current side if you manage to fall - look for the
ledges on the sidewall to climb back up. Step off the pressure
button and wait for the rock platform to rotate back to its
horizontal position
then jump across to the middle statue's platform. There is
a shiny metal piece on the statue's chest, but you can't do
anything with it at the moment. Jump across the next rock
platform and push the block on top of the pressure button
on that side. Jump all the way back to side with the other
pressure button and stand on the button. Notice that the manacle
piece up above the statue
on its left side will fold outward as the rock platform rotates.
You need to jump on the rock platform as the manacle moves
back into place and get to the middle platform then grapple
the shiny metal piece on the statue's chest and tug it before
the manacle swings all the way back around the statue's arm.
There is no need to run across the rock platform while it
rotates. There is plenty of time to wait for it to go back
to its horizontal position then jump across. If you do jump
while the rock platform is rotating make sure to jump toward
it when it starts to turn horizontally in order to land on
it without falling.
-- CHECKPOINT --
Now the water is flowing through the channel below. Jump
off the side in front of the statue and swim toward the channel.
Now it's time to go back to the Wheel Room. Climb back down
the steel ladder
near the end of the channel and fall to the crevice below
it. Move to the right along the crevice then fall and grab
the next crevice. Move to the right some more then jump and
grab the stone ladder. Climb down the ladder then run to the
next ladder near the waterfall.
-- CHECKPOINT --
Climb down the next ladder and a cutscene will play to show
you that the traps are now working. That is a good thing!
At the bottom of the ladder jump to one of the pole on the
wheel
or fall to the area below and stand along the sides to jump
and grab a pole. Swing from the pole to the rope then swing
to the doorway
with the traps.
-- CHECKPOINT --
Jump through the traps
instead of running to get through them quicker. The handle
of the spears will hit you so avoid touching them altogether.
Up ahead you'll see some spinning blades
down the hall. Grab the stone block to the side and slide
it along either side in front of you as you push it
directly into a set of spinning blades. The blades will remain
trapped on the other side
of the stone block. Do not push the block all the way to the
very end since the blades will start to close in on Lara from
behind. Once you see the blades start to move out of the sidewall,
stop and jump on top of the block then jump over the blades
on the other side. Go up the stairs and turn to the left to
see some more spinning blades - this time without any blocks
to help you. Wait until a set of blades starts to move toward
you, then either jump or roll over the first set and run toward
the next set then jump or roll under the that set. Stay in
the middle while jumping and rolling and you will be less
likely to get hit. If the blades catch you and you get thrown
into the middle then it's all over. Run through the doorway
ahead.
-- CHECKPOINT --
Move up the stairs then down
the next set of stairs. When you reach the broken traps ahead,
a large boulder
will roll down the stairs directly toward you. Jump over the
first set of traps on the right side then roll under the second
set on the left. Jump over the gap at the end for a cutscene.
-- CHECKPOINT --
Climb down the stone ladder to the right of the doorway (facing
the doorway) you just came through to find a
at the bottom. If you move over toward the waterfall on the
same level where you get the Silver Reward from, you will
notice a green platform. There is now a set of platforms next
to the waterfall that will bring you back up to this area
if you should fall. Climb back up the ladder.
Jump to the pole
over to the side of the doorway and jump to grab the ledge
on the other side. Move to the left then jump and grab the
ledge overhead. Move to the left some more and hop across
to the ledge
behind you. Notice the rock debris raining from above. When
you jump to the next ledge overhead, you will need to quickly
jump to the pole across from the ledge since a piece of rock
will fall down from above. Swing across the two poles to reach
the ledge on the other side.
-- CHECKPOINT --
Turn to the right and jump on the lift
up ahead. The lift will lower, but stay on it and will take
you down to the next platform. Jump across then jump to the
next lift and hop to the other side.
-- CHECKPOINT --
Jump to the pole
on the side. Make sure to stand diagonally across from it
when jumping to it. Swing from the pole over to the ledge
across from it then move to the left. Notice the same debris
from earlier will rain down again. Jump to the ledge overhead
[268] then quickly jump to the pole on the right before the
rock falls on you. Swing to the next pole then turn around
and swing to the one overhead. From the top pole, swing and
grab the ledge across from it then move to the left quickly
before the rock piece falls on you from above. Jump to the
ledge overhead then move to the left and jump to the area
across from it.
-- CHECKPOINT --
Run down the hall through the doorway to trigger a cutscene.
Turn on your light and run down the stairs ahead into the
dark corridor. Don't run too far since there are two spike
pits up ahead. Use the shiny metal piece
above each of them to grapple and swing over
them safely. Walk through the doorway ahead and some mercenaries
will attack while standing on a bridge. Aim for the stone
piece up above them and shoot it to make it collapse on the
bridge and break it, taking the mercenaries down with it.
Grapple and swing on the shiny metal piece above the broken
bridge to get to the other side if you break it.
-- CHECKPOINT --
Run through the entrance up ahead and look off to the right
to see a cracked metal door near a platform beside you. Swing
on the two poles
to the right side and grab the crevice across from them. Jump
to left across the waterfall and grab the next crevice then
fall. Throw a grenade toward the cracked door from the side
to blow it up and find a behind it. You can come back to this area later
if you grab the grenade launcher from the mercenary up ahead.
Leap back to the crevice across from the waterfall via the
crevice that you just fell from. Jump to the crevice overhead
from the current one, then move to the left and jump up to
the next crevice. Jump up one more crevice then move to the
right. Jump and grab the crevice overhead then jump
to the pole across from it and swing across the two poles
ahead to reach an area with tons of explosive barrels. Walk
across the metal bridge then move down the ramps to see some
mercenaries up ahead. The one in white has a grenade launcher
so try to get rid of him quickly. Be careful at this part
since the wooden bridge will be destroyed if a grenade hits
it. The ropes that were holding up the bridge will still be
available to swing across, but if a mercenary hits you while
you're swinging then you will fall.
-- CHECKPOINT --
Walk through the doorway ahead and a leopard will attack
on the other side. Grab the onto the side of the broken stairs
ahead
then quickly jump toward the rope on the right since a large
boulder will roll down the stairs as you walk up them. A second
boulder will follow the first. Make sure to climb the rope
a bit before you swing on it. When you swing to the other
side, run up the stairs until you see a boulder coming, then
run back down the stairs and jump back to the rope. Hop back
on the stairs then run to the top. Step on the pressure button
at the top to open the door
up ahead, but don't go through it just yet. The button doesn't
just open that door alone! Run back down to the brown door
in the area you were just in to find the in the very back of the dark room past
the door. Get back to the top and step on the pressure button
then wait for the door to fully open. Run and roll under the
door.
| |
 |
Start the battle by shooting him with your handguns. Roll
or jump backwards or to the sides to avoid his attacks when
he runs up to you. Be on the lookout for his grenades since
he will get very grenade happy at times and will litter his
surrounding area with three grenades. Notice how you take
his energy mighty fast with just your plain handguns. He will
eventually jump to one of the top four stones on the side
and regain his health. After he has regained his health once,
you can shoot at the bottom part
of each of the four stones
to reveal a shiny metal piece below each one. Grapple the
metal piece and tug on the grapple to make each stone piece
fall and break.
Once all the stone pieces are gone, switch to your secondary
weapon and go all-out
on him with constant gunfire!
|