|
WALKTHROUGH - BOLIVIA
"Anaya telephoned today. She heard a rumor about
an ancient temple in Bolivia that contains an ornate stone
dais. It could be the one I'm looking for. I'm setting out
first thing in the morning."
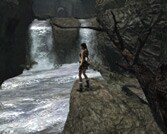
From the start of the level,  follow the left mountainside and move around the large boulder
ahead to find a .
Go ahead and use this chance to get used to the controls.
They feel quite different from past Tomb Raider games. Jump
over the broken rock overlapping the river (or climb up the
other side to the right of the river) and move toward the
lake in the back under the waterfall. Look off to the right
while next to the waterfall to see an opening in the side
of the mountain containing a .
Jump in the lake and swim to the opposite side. Pull yourself
up on the other side then jump and climb up to the area above.
follow the left mountainside and move around the large boulder
ahead to find a .
Go ahead and use this chance to get used to the controls.
They feel quite different from past Tomb Raider games. Jump
over the broken rock overlapping the river (or climb up the
other side to the right of the river) and move toward the
lake in the back under the waterfall. Look off to the right
while next to the waterfall to see an opening in the side
of the mountain containing a .
Jump in the lake and swim to the opposite side. Pull yourself
up on the other side then jump and climb up to the area above.
-- CHECKPOINT --
You'll need to grab the rock with the grab button and push
it off the side of the mountain. Jump and grab onto the large
rock platform ahead. Climb up the first vine then hold to the right and jump to the vine across from
you. Hold right again then jump to the area to the right.
-- CHECKPOINT --
Walk to the end of the mountain platform and jump to the
dangling vine
up ahead to make Lara automatically grab on. Turn to the left
while on the vine and line yourself up with the cave entrance
to the left of the waterfall. Swing on the vine and jump to
the entrance. Turn on Lara's light (D-pad left) as you run
further into the cave since it is quite dark. At the end,
pick up the .
Fall down to the cave below. This is the same area that you
saw behind the waterfall while you were on the vine. Turn
on the flashlight again if it's not already on and run to
the end of the cave. Jump to the other side and pull yourself
up. Jump and grab the crevice on the side of the mountain
and shimmy all the way past the cave entrance to the other
side. As the on screen tutorial suggest, tap the action button
while shimmying to move quicker. At the end, press the jump
button and Lara will jump to the area with the river across
from her.
-- CHECKPOINT --
Walk up the river, but be wary of the boulder
up ahead that will roll to the right side and barrel down
the river as you approach it. Stay to the left side to avoid
it. Walk further ahead to find some tree branches extending
out of the mountain walls. Stand on the sloped rock in the
river and jump to the first tree branch. Climb to the left
along the tree branch
then swing to the second branch. Swing to the ledge on the
left side of the waterfall from the second branch. Shimmy
across to the end of the ledge, then hold to the right and
jump across to the ledge on the right side of the waterfall.
A cutscene will activate. After the cutscene, follow the
| |
 |
mercenary and listen to his conversation or just go ahead
and shoot him with Lara's handguns. He will eventually turn
and notice you. Look off to the left after shooting him to
find a
across from the fallen tree. Use your binoculars to look at
the tree
and Lara will hint that it appears to be a mechanism that
she can use to her advantage. While facing the tree, turn
around and look up to find a ledge on the structure up above.
Jump and grab onto the ledge then climb over to the right
side. When the platform up above is in view, press the jump
button to make Lara jump and grab onto the side of the platform.
Pull yourself up and push the rock off
the side to weight the tree down. Fall back down to the river
then stand on the sloped rock next to the tree. Jump to the
tree branch
on the left side of the tree and use it to swing to the rock
platform in between the two waterfalls.
-- CHECKPOINT --
Press the grapple button to make Lara grapple the shiny disc
up ahead. Press the action button after grappling it
to have her pull the disc out of the entrance and break it.
A cutscene will play showing two mercenaries on the other
side. Lock on to them and shoot with Lara's handguns after
the cutscene. Walk toward the waterfalls in the back and use
the sloped rock to gain some extra height so you can jump
to the ledge behind the waterfalls. Climb across the ledge
really fast since it will break in the middle. If you fall,
jump back on the ledge and hold left then jump across to the
other side of the ledge. Jump to the pole across from the
ledge then swing to the crevice on the column. Shimmy across
the crevice then hold toward the crevice to Lara's left and
jump to it. Jump to the platform above.
-- CHECKPOINT --
Turn around to see a dangling vine in front of the waterfalls. Jump and swing to the ledge
behind the waterfalls. Move to the left along the ledge and
move the camera around to notice an opening up above with
a inside. Jump
and pull yourself up to retrieve it. Walk past the waterfalls
to see two poles in the distance. Use them to jump and swing across to
the rea on the other side.
-- CHECKPOINT --
Right when you land from swinging, a mercenary will rush
out from behind the right wall and shoot at you. Blast him,
then move down the path that he came from. You'll reach a
broken bridge ahead with a shiny disc up above it. Use the
binoculars to view the shiny disc to get some hints as to
what to do next. Stand at the edge of the broken area and
double tap the jump button or jump and tap the grapple button
to have Lara jump and shoot out her grapple toward the disc
and swing from it. When you first grapple to it the broken
bridge on your side will fall. Swing then jump to the other
side while on the grapple. If you swing to the left or right
too much then the grapple will retract and you will fall.
Use the broken bridge to climb back up to where you were.
As you walk to the area ahead, look off to the left side to
see a in an
alcove up above you. Use the grapple from far away to latch
on to it then use the action button to retrieve it. Walk deeper
into the walled area ahead for a cutscene.
-- CHECKPOINT --
|
|
A message on the screen will mention that you can shoot certain
environmental hazards
by pressing the action button while in lock on mode. Go ahead
and press the lock on button and shoot the group of rocks
before the mercenaries notice you to kill both of them. Slide
down the ramp
then prepare to shoot two more mercenaries that will appear
off to the left. Look to the right to find a small opening
in the side of the mountain containing a .
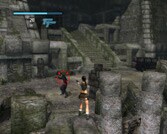
Jump and enter the area where the two mercenaries came from
then fire at the mercenary
on the top platform to your left (it may be easier to go around
the other way and kill him). Look off to the right to see
a at the end
of the path in front of the stone pillar. Climb up to the
area where the lone mercenary was and grab his SMG (Action
button) then use the vine ahead to swing across to the other
side. Slide down the ramp and shoot at the stone pillar while
locked on to the mercenaries in the distance to kill at least
one of them. Run straight ahead and shoot the rest of the
mercenaries next to the vehicle. Grab either an SMG or an
Assault Rifle and head up the stairs toward the tomb entrance.
After the cutscene, turn around and hop over the stairs railing
to the left. All the way to the left there is a weak wall
that you can shoot at to reveal a . Enter the tomb up ahead.
-- CHECKPOINT --
Kick one of the rocks with the action button to see what
dangers lie ahead. The floor will slide open to reveal rotating
spiked pillars that could easily grind our heroine into tiny
bits. Move to the edge, then jump and tap the jump button
to grapple onto the shiny disc overhead and swing across to
the other side. Lara gets mighty close to the spikes while
swinging but they will not hit her as long as you grapple
from the edge. Walk straight ahead and turn on your light
then turn to the left. Move the camera around to Lara's side
and take a look at the fallen debris to the left. Notice the
small crack. Enter the small opening to find a behind the debris. Go back through the
opening and enter the area with the chains. Walk behind the
chains then start to climb the left chain until you reach
the rock piece. Hop over to the other chain to the side and
quickly climb it as it moves downward then jump back to the
chain you were just on when you move up past the rock. Jump
to the opening across from the chain then walk to the end
and jump to the chain in the room ahead. Slide down and enter
the opening in the collapsed wall.
-- CHECKPOINT --
At the end,
jump into the water and dive down a bit then swim to the right
just a bit until you can surface once again. Pull yourself
up onto the side of the cave floor to find a behind some debris. Jump back into the
water and swim toward the light then climb out.
-- CHECKPOINT --
Move ahead and a leopard
will walk out from behind the left wall. Switch to your second
firearm and open fire on the leopard. Hop around while firing
if he attacks. Walk down the stairs ahead then stop! The walls
up ahead will move together and try to crush you. Wait for
them to start to separate then run through them. Examine the
cage on the other side with the binoculars to discover that
it is movable. Grab the cage
(with the action button) from the side or the back and push
it toward
the next set of moving walls. Once the first set of walls
starts to open, push the cage in between them and keep pushing.
The walls will move together but the cage will stop them from
closing in all the way. When you push the cage to the second
set of walls, wait until they start to open then start to
push once again. When you make it to the second set of walls,
push the cage about midways between them then jump on top
of the cage and move to the other side. Run to the doorway
up ahead.
-- CHECKPOINT --
Before messing with the puzzle, move toward the chain on the
right side. While next to the chain look over to the right
up above you to see the final .
Look around the big room to scope out each of the metal cages
and each of the pressure buttons. You do not need to get all
three of the cages up to the floor that you are currently
standing on, but you must get at least two - Lara can stand
on the third button. The middle pressure button lifts the
gate and the right and left pressure buttons retract the stopper
piece on each side gear. Go ahead and move the first cage
on the top floor over to one of the pressure buttons on the
floor you're currently on. After moving the switch fall down
to the area below. A leopard will step out from the middle
portion and attack. Pull the cage on the left side out from
under the long rock. Push the cage on top of the rock (on the side you pulled it out from) and let it slide
down until it stops. Now, jump back onto the middle portion
with the middle pressure button, go up the stairs, and line
Lara up with the other end of the long rock. Jump onto the
rock and the camera will switch to show Lara landing on the
other side. The cage on the opposite side will fly upwards
and land on the floor above. Run to the other side of the
bottom floor and grab the other cage if you want to then move
it over to the long rock and do the same thing to send it
up to the top floor. Climb back up to the top floor and push
each of the cages over the remaining switches or have Lara stand on the third switch if you only have
two. A cutscene will play and the door at the
top will open.
Now, in order to get the Gold Reward for this level, pull
the middle cage off of the center pressure button. Stand on
the other pressure button until the door falls all the way
back down. If you got all three cages and two cages are on
the back three buttons then the door will automatically fall.
Push one of the back cages off of either of the side buttons.
Now push a cage over the middle pressure button. The door
will try to lift, but it cannot. With Lara, stand on either
the left or right pressure button, whichever is without the
cage, to make the two stopper pieces along the side of the
corresponding gear move back into the wall. Let the gear move
so that two of the gear's teeth move by the area where the
stopper pieces extend out then step off the pressure button
to lock it in place. It should have stopped on the second
gear groove and the door should be only half open.
|
|
In order to get to the door, run over to the left chain
and jump then pull yourself up to the left area next to it.
Wait until the chain moves downward then jump and climb it
until you are in line with the small ledge next to the chain.
Jump to the ledge then shimmy across and jump to the area
above with another chain. Use the chain to climb across the
gap then fall to the other side. Walk to the end of the right
side and fall off the side to make Lara grab onto the side
of the wall. Drop down one ledge and shimmy across the bottom
ledge to the right then jump to the pole and swing to the
platform with the door that you just opened.
-- CHECKPOINT --
Don't go through the door or bother with the gold reward
just yet. Turn on your flashlight and walk over to the right
side. Look off to the right to see a crevice on the wall.
Jump to the crevice and shimmy all the way across until you
see an open area to the right of the statue against the wall.
Jump up to the area up above to see a directly across from the platform you're
currently on. Climb across the chain to get to it.
If you rigged the door to where it is half open then jump
to either of the crevices on the columns to the side of the
door then jump to the next crevice up above it. Move over
to the far side, closest to the door, and jump toward the
door to grab onto the small groove on the mouth of the door
engraving. Notice that the door has two grooves along the
side of the engraving mouth - that's to let you know where
exactly to line it up. Jump and grab the top of the door then
jump to the pipe-like structure up above the door to find
the .
-- CHECKPOINT --
When you walk through the doorway, you will activate a QTE
(Quick Time Event) where you must press the buttons displayed
on the screen after they appear to keep from dieing.
Lara will run down the corridor and (CROUCH) roll under the
first set of blades that swing in front of her then (JUMP)
over the next set that moves toward her.
Walk down the halls ahead.
-- CHECKPOINT --
| |
 |
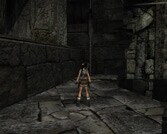
Walk up to the end of the ledge ahead and step off so that
Lara grabs onto the side. Move to the right along the ledge
then drop down the next two ledges until you fall to the bottom.
A leopard will attack when you walk toward the middle. After
blasting the leopard,
look at the wall to the side to see that one piece is a bit
lighter than the rest of the wall. Push against the light
piece and push it all the way to the back of the opening in
the wall as far as it will go. Turn to the right to find a
tunnel that will lead you to a . Go back outside and head for the debris off
to the right side. Stand on the piece of floor and jump to
either of the poles on the wooden pillar. The pillar will
rotate and move you next to another pillar. Swing and jump
to the next pole on the next pillar. Either way you will eventually
land on a pole next to a ledge. Jump to the ledge then shimmy
to the right and jump to the ledge further to the right. While
on the middle of the ledge that you jump over to, line Lara
up with the pole behind her on the wooden pillar and jump
to it. The wooden pillar will rotate so that you will be directly
across from the last .
Swing across to grab it. Jump back to the pole (while standing)
to get back to where you were. Move along the ledge then jump
to the next two ledges above. On the top ledge, move to the
right then jump to the left and grab onto the final ledge.
Shimmy over to the platform then drop. Pull yourself up to
the floor above then run down the hall and jump over the debris
up ahead.
-- CHECKPOINT --
Walk through the doorway to start a cutscene.
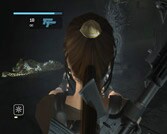
After the cutscene, run straight ahead while on the bridge
to avoid the helicopter. Do not attempt to fight it! You will
have to jump twice since the bridge will break apart from
the helicopter missiles. Keep running until you reach the
other side
then get ready to start blasting.
Hide behind the columns until you get a clear aim on each
of the mercenaries then step out and shoot. There are a total
of eight of them. After you have killed them all, a cutscene
will play to end the level.
|