WALKTHROUGH - Chapter
3: A Broken Promise
Walk down the hall ahead and run over the spiked traps
when the spikes go under the floor.  Roll or run by the spike pillars on the opposite
side when they go to one side. The next trap is a mix
of the first two - run ahead as the spikes go under
the floor and stay on the opposite side of the spike
pillar. Do the same thing for the next area only watch
the spiked pillars more closely. Wall run to hit the
switch on the wall then get through the gate quickly.
Roll or run by the spike pillars on the opposite
side when they go to one side. The next trap is a mix
of the first two - run ahead as the spikes go under
the floor and stay on the opposite side of the spike
pillar. Do the same thing for the next area only watch
the spiked pillars more closely. Wall run to hit the
switch on the wall then get through the gate quickly.
As soon as you run to either side of the room the
floor will start to give away. Run along the left side
and the floor will not fall below you - it will just
fall beside you. Jump on top of the small column to
the right of the door. Turn your back to the column
in the back and jump to the next two. When the third
is reached, turn your back to the ledge above the windows
and jump to it. Immediately move to the right as you
jump because the ledge will fall in that portion. Move
to the right and jump to the column in the back. The
column will collapse just a few seconds after grabbing
it so jump and stab the dagger into the wall across
from it immediately. Wall run to the right and stab
the dagger into the next wall plate. This second plate
will fall in a few seconds, so wall run to the right
instantly and stab the third plate. Jump to the next
two columns in the back then jump to the ledge slightly
below you before both columns collapse. The camera angle
for the second column will show you the ledge below.
From the ledge, jump to the hole in the wall and then
jump and slide down the curtain. When you near the bottom
of the curtain jump off of it to land inside of a gap
across from it. If you miss the jump at the bottom of
the curtain, the Prince will luckily grab onto a crevice
below the curtain allowing you to still jump to the
gap. Either way slide down the gap and fall to the room
below. There is a save fountain to the side.
SAVE FOUNTAIN
Be sure to break any breakable objects from now on
to get sand credits to recharge your sand gauge and
unlock some extra content. Run down the hall ahead and
roll through the first trap when the pillar goes to
one side and the spiked wall spikes go inward. The second
trap has an easy pattern - just run once the first set
of spikes go under the floor. The third trap can be
rolled
through as the spike pillars go to one side. Be sure
to keep running even after going through the trap since
the floor will give away until you reach the doorway
in the distance.
| |
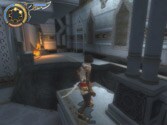 |
Walk into the next room and leap across the gap in
the floor. The guard in the back will catch sight of
you instantly. Wall run over to him and defeat him.
Climb on top of the area with the broken column
and jump to the small strip of floor that is still
left. Walk along the strip to reach the area to the
side. Two guards will charge through the doorway.
Defeat them and walk through the doorway to find
10 sand credits in the chest. Climb on top of the small
section of the wall to the left of the flame and use
it to reach the top of the collapsed floor. A guard
will be waiting at the top. Get on top of the small
section with the broken railing and jump and stab the
plate in the back. Jump and stab again for the second
plate then jump to the ledge above and use it to reach
the area to the left. Wall run to the small strip of
floor ahead - you'll have to stop this wall run early
in order to land on the floor. Wall run again and jump
off the shutter in the distance. The shutter will send
the Prince flying toward a ledge that leads to a doorway
and a save fountain.
SAVE FOUNTAIN
Hit the switch and dash through the doorway. Run down
the stairs in the halls ahead and enter the room at
the bottom.
|