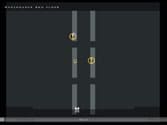
The mission starts you off on a street, facing a bar.  Run to the doors of the bar and go inside. Talk to the bartender
to get some info.
You will see two dockworkers sitting in chairs.
Talk to the one holding the drink, then turn around. You will
see a hallway with two doors.
Ignore them both, and follow the hall as it goes to the left.
There is another door here. Go through this one, and you’ll
be in the window display. Talk to the prostitute here, ,
and she’ll leave the bar to offer the man standing by
the car a “good time”. Follow her outside. Once
the prostitute gets outside, she’ll approach the man,
and they’ll both go around the corner. When they start
making out, ,
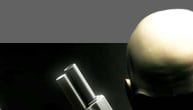
head to the driver’s side of the car, and place the
GPS Transmitter on it.
Run to the doors of the bar and go inside. Talk to the bartender
to get some info.
You will see two dockworkers sitting in chairs.
Talk to the one holding the drink, then turn around. You will
see a hallway with two doors.
Ignore them both, and follow the hall as it goes to the left.
There is another door here. Go through this one, and you’ll
be in the window display. Talk to the prostitute here, ,
and she’ll leave the bar to offer the man standing by
the car a “good time”. Follow her outside. Once
the prostitute gets outside, she’ll approach the man,
and they’ll both go around the corner. When they start
making out, ,
head to the driver’s side of the car, and place the
GPS Transmitter on it.
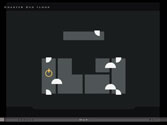
With the tracking device set, run down the street behind
where the guard and the girl were, and turn right. You’ll
see a closed off area.
Walk to the fence, and follow it to the left. You will come
to a switch that controls the television in the guard booth.
Run back to the guard booth, and stand here, ,
until the policeman leaves to investigate. When he does, sneak
through the open gate to the right, .
Check your map to make sure the patrolling cop isn’t
nearby, or he’ll force you to leave. If the coast is
clear, sneak into the police station.
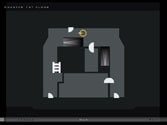
When you’re inside, you’ll see a cop to your
left.
To get by unnoticed, crouch-walk along the window to the other
side. You will see a cutscene of the car being loaded onto
the ship.
After the scene ends, keep crouch-walking until you get to
the hallway.
Quickly take a left and enter the door on the right, before
the patrolling cop sees you. You are in a locker room. Take
the police clothing.
Leave the locker room, follow the hall past the entrance
you came from, to the left, and go out the door at the end.
You are in the garage, and you should see a cutscene of the
warhead being armed.
Head out the door to the right of the police van, and you’ll
be back outside.
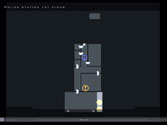
You’ll want to hang a right, and run toward the metal
container and crates. When the path splits, take a left toward
the small shack with a door.
Make sure no police are looking at you or walking in your
direction, then pick the lock, and enter sneak mode. Walk
inside, and open the door to the direct right of the one you
just came in. Inside this room are two white doors, one to
the left and one to the right.
Wait for the dockworker to come from the left side and go
to the right, and then enter the left door.
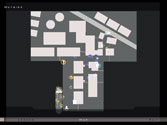
You are now in a warehouse.
You will need to make your way to the metal stairs, across
from where you came in.
Make sure that the guard on the other end of the warehouse,
in the upper level, is walking AWAY from you before heading
to the stairs, or he’ll see you. When the path is clear,
sneak up the stairs.
On the upper level, ,
again make sure the guard across is walking away, then head
to the crates. In the middle of the food crates, on a small
wooden one, you will see some clothing.
Change into it, and you are now disguised as a dockworker.
Return down the stairs you came from, back to the main floor.
Instead of going outside, however, go down the ladder into
the bypass corridors.
When you’re in the tunnel, make a right, then a left,
and follow the path all the way to the again. When you come
to a junction, ,
take the right path, then head left, then right, and climb
the ladder at the end.
You emerge outside, behind some crates.
By doing this, you bypassed the guards, and you get to keep
your weapons. Move around the crates to the left of the sewer
entrance, and head to the ramp leading to the ship.
Walk up the ramp, past the guard, or he’ll suspect you.
When you’re on the ship, take a right.
If you’ve been doing this fast enough, you should see
Boris on the upper deck, moving from the left door to the
right one.
You should enter the door directly underneath the one he’s
about to go in.
In the hall, go into sneak mode and enter the door to your
left. Inside is a biker. Sneak up on him and stick him with
the Syringe, then drag his body behind the kitchen
counter.
Don’t change clothes. Now, crouch behind the kitchen,
but keep your field of view clear.
A guard may wander in, but don’t worry. What we are
doing is waiting for Boris to come in. It may take close to
a minute, but when he does, wait for him to turn his back,
,
then shoot him once in the head with your silenced Silverballer.
Pick up the Detonator, then drag his body to the same location
as the biker. Now, we have to escape.
You’re on a bit of a time limit, because you don’t
want the biker to wake up and see Boris’ corpse. So,
we’re going to sprint to the exit. Your escape point
is all the way at the beginning of the mission where you started
(near the Dirty Rabbit strip bar). So, just make your way
through the docks. Make sure your weapon is holstered. If
you have to pass someone closely, walk by them. Exit through
this gateway.
Don’t worry; because you’re dressed like them
and leaving, they won’t stop to frisk you. Your only
problem now is avoiding the cops. If you get too close that
one suspects you and stops you, walk the other way until your
meter goes down, then continue. When you see the bar, ,
walk past it, and head into the tunnel. About halfway through,
the mission ends.
An alternate way to escape is to return to the bypass corridor,
follow it back to the warehouse, exit the warehouse, and run
to the bar from there. It’s longer, but you bypass most
of the cops.
Congratulations, you’ve just beat the sixth mission.
With your Silent Assassin rating, you have unlocked the M4
Carbine Assault Rifle Silenced.
Outside |

Bypass Corridor |

Tunnel |
Warehouse 2nd Floor |
| |
|
|
|

Warehouse 2nd Floor |

Coaster Bridge |
Coaster 2nd Floor |
Coaster 1st Floor |
| |
|
|
|

Coaster Below Deck |
Police Station 1st Floor |
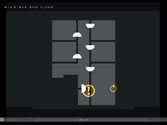
Strip Bar 2nd Floor |

Strip Bar 1st Floor |
| |
|
|
|

Strip Bar Basement |
|
|
|
|