| INTRODUCTION
- Mission 08 - Volcano Dome Facility
"Neutralize the Volcano Dome facility. Fight
your way through the canyon, find the entrance and infiltrate
the dome."
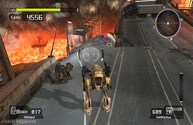
Thin out the Trilids up ahead then shoot at their hives
on the wall with the machine gun. Pick up the HAND GRENADES
past the vehicle and grapple up on top of the metal
crates ahead. Grab the MACHINE GUN on the side. You'll
notice a Scorpion Akrid below the crates.  Ignore him for now and grapple to the area above the
metal wall with the light on the right side. Activate
the DATA POST (1/12). Get on the first steel beam to
the left and pick up the RIFLE. Zoom in on the glowing
portion of the Scorpion's tail below and shoot it then
shoot it on its heat source in the middle of its body
when it turns over on its back. There is a VS ROCKET
LAUNCHER in an alcove on the left wall on the other
side of the left steel beam. Pick up the HAND GRENADES
on the steel beam across from you then fall down and
grab the MACHINE GUN and the ROCKET LAUNCHER in the
area where the Scorpion was.
Ignore him for now and grapple to the area above the
metal wall with the light on the right side. Activate
the DATA POST (1/12). Get on the first steel beam to
the left and pick up the RIFLE. Zoom in on the glowing
portion of the Scorpion's tail below and shoot it then
shoot it on its heat source in the middle of its body
when it turns over on its back. There is a VS ROCKET
LAUNCHER in an alcove on the left wall on the other
side of the left steel beam. Pick up the HAND GRENADES
on the steel beam across from you then fall down and
grab the MACHINE GUN and the ROCKET LAUNCHER in the
area where the Scorpion was.
| |
 |
Another Scorpion will fall down from the mountain side
when you walk down the path up ahead. Shoot it in the
middle of its tail like the last Scorpion. They are
not that powerful despite their appearance and aggressive
nature. Collect the HAND GRENADES from the top of the
truck if needed.
Grapple to the steel beam above the crates on the right
and grab the HAND GRENADES and the MACHINE GUN.
A Scorpion will jump down in the back of you. You can
either fall down in the hole or go back down and climb
through the space in the crates. Make use of the explosive
barrels to defeat the Spider Akrid and their hive below.
You'll find a SHOTGUN and another MACHINE GUN along
the side of the crates.
Shoot the shutter or crouch and move under it then
shoot the Spiders down the ramp to the right. A Scorpion
will move up the ramp after a few of the Spiders have
been defeated so you may want to save the explosive
barrels for him. Activate the DATA POST (2/12) when
the area is secure. A few Scorpion Akrid and Spider
Akrid will attack along the sides of the area ahead.
Blast the hive along the right side and grab the MACHINE
GUN pickups along the way. You may want to throw grenades
down at the Scorpions below. The Scorpion Akrid can
actually jump up to your area so be ready to deal with
them at any time. You can go through the small doorway
to find a GTB-11 Vital Suit outside, but I would recommend
moving down the ramp and getting inside the new GAB-25M
Spider VS at the bottom.
This suit can transform into a drill by tapping the
Y button and has a drill dash attack (X) much like the
last boss had. It has its own exclusive cannon (RT)
and laser gun (LT). It also has the standard hover ability
(A while jumping) and a dash that can be performed by
tapping to the side with the press of the Y button while
moving in normal VS mode. Move down the path ahead and
attack the Wasp Akrid that fly around. Drop down to
the street and hop out of the Vital Suit so you can
activate the DATA POST (3/12). Ride up to the door to
enter the next area.
 |
|
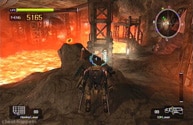
As Luca mentions, setting foot into the lava is instant
death if you are outside of your Vital Suit.
Get out of the VS and grab the MACHINE GUN to the left
then blast through the shutter ahead. The next room
is filled with tons of Trilids. Blast the hives on the
ceiling with the laser vulcan or cannon then exit out
of the VS and shoot the rest of the Trilids with the
machine gun. There are some HAND GRENADES up ahead and
a MACHINE GUN on the metal piece leading across the
lava along with a SHOTGUN and GATLING GUN on the other
side. A Wasp Akrid will attack from the other side of
the room. Continue through the gateway up ahead.
Blast the Wasps outside and take note of the GTB-11
VS suit and MACHINE GUN to the right if you need them.
Activate the DATA POST (4/12) on the left then fall
below. A Dongo and a few Scorpion Akrid will attack.
Blast open the metal container at the bottom to reveal
a GTB-22 Vital Suit.
Pick up the SHOTGUN and HAND GRENADES if needed then
walk straight down the path ahead next to the lava.
Trilids will be grouped above a new Spider VS and a
MACHINE GUN pickup. A Scorpion Akrid will appear as
you near the Vital Suit. Change over to this Spider
VS suit if you still have the old one. Pick up the VS
SHOTGUN and the GUN GRENADES if needed then activate
the DATA POST (5/12).
Prepare for several Dongos, Scorpions, and a few Wasps
as you move up ahead. They will pile all over your Vital
Suit. Find their individual heat sources then spam them
with laser vulcan fire or cannon blasts. A GATLING GUN
is to the side and you can grapple up to the container
on the side of the mountain to find a PTX-140 Vital
Suit (blast the container open) along with a ROCKET
LAUNCHER near the top. You may also choose to exit this
area from the street suspended in the air on the side
of the metal container containing the suit. There is
another DATA POST (6/12) up there as well. Two ROCKET
LAUNCHERS and a SHOTGUN are next to the ramp up ahead
on the right side. Move up the ramp to the bridge above.
You'll find several other pickups on the way along with
a GTB-11 Vital Suit. Activate the DATA POST (7/12) behind
the truck at the top. A few Scorpions and Wasp Akrid
will attack near the Data Post. Enter the doorway that
the light from the Data Post is pointing to. A cutscene
will play upon entering the door.
| |
 |
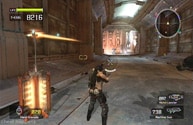
Laser bots will be patrolling the area past the truck
up ahead. Grab the MACHINE GUN, ROCKET LAUNCHER, and
maybe the ENERGY GUN (behind the crates) and continue
ahead. Get in the GTB-22 Vital Suit then continue down
the street. Some enemy Vital Suits will attack when
the street slopes downward. Concentrate on the enemy
with the rocket launcher first. You may want to pick
up the GUM GRENADES along the way. A GTB-11 suit is
on the ground right before you make it to the DATA POST
(8/12) off to the side.
Pick up the ROCKET LAUNCHER next to the Data Post. If
you go further down the street to the right you'll find
tons of Nevec soldiers and an enemy VS suit along with
four VS suits that you can enter (GTB-22 and Spider).
If you entered from the alternate door in the last area,
you'll start above this street and will need to jump
down to it. You'll have a choice of a few other Vital
Suits while on the street above.
 |
|
Fall down the left side of the street to the rocks
below. Blast the enemy Vital Suit on the metal platform
above the lava. You can go across the left metal bridge
and find a PTX-140 Vital Suit in the metal container
on the other side. I would recommend grabbing it since
it comes equipped with a homing laser and EM laser.
Watch out once again for the enemy Vital Suit one of
the other metal platforms above the lava. Pick up the
MACHINE GUN and HAND GRENADES on the bridge if needed.
There is a PLASMA GUN under the debris facing the bridge
with crates so be sure to grab it! Your destination
is past either of the other metal bridges without crates
or you can jump above the bridge and hover over the
metal crates to get by them for the middle bridge to
get their quicker. Move across the bridge on the right.
Activate the DATA POST (9/12) on the slanted rock to
the left when you get off the right bridge. The Data
Post will point toward the tunnel up ahead. When you
get close to the stairs that lead toward the tunnel,
an enemy Spider VS will attack. Blast it with whatever
heavy firepower you have at the moment and try to remain
hovering while fighting it. This is much like fighting
the last boss, except the enemy suit is just a bit weaker.
| |
 |
Activate the DATA POST (10/12) near the dropoff up
ahead. Laser Bots will rise from the bottom of the dropoff.
Fall into the hole then walk through and jump up the
platforms on the other side. Be sure to pick up the
EM LASER if your VS can carry it. Activate the DATA
POST (11/12) on the other side then walk into the room
up ahead. A MACHINE GUN and pickup of HAND GRENADES
will be along the side of the tunnel. A PTX-140 Vital
Suit will be lying in the next room and a few enemy
Vital Suits will be patrolling the area (one of them
has two homing lasers). Be sure to arm the PTX-140 with
the EM laser if you switch. Activate the next DATA POST
(12/12) in the area that follows and it will point up
to another tunnel.
Be sure to take advantage of all the extra tanks for
a big T- ENG boost. There are plenty of extra weapons
around the area as well including another EM LASER and
VS ROCKET LAUNCHERS. Jump up to the right platform and
walk around the side to the center platform. Fight off
the enemy Vital Suit then enter the middle tunnel with
the fans. Luca will contact Wayne as you enter the tunnel.
There are three enemy Spider Vital Suits below. I would
suggest standing on your current platform and shooting
them with the rocket launcher. These three Spider Vital
Suits seem weaker than the last Spider VS battle.
 |
|
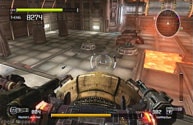
This boss can be a real monster especially if you haven't
defeated the other Spider VS suits from a safe distance.
Be sure to finish them first if you haven't. Keep in
mind that you can always get up on the side of this
area and there are two PTX-140 suits waiting at the
top. Blast the Spider VS in the middle portion to damage
him just like the last Spider VS battle. Shoot him with
the EM laser, rocket launcher, or grenade launcher.
There is a grenade launcher on a circular platform in
this area that will help out tremendously for damaging
this boss. He will attack much like the Spider VS in
the last fight, but he is more aggressive. He will spam
your VS with plasma shots at times and will try to ram
you often. He will also jump and try to land on you.
Be sure to hover a bunch to avoid his attacks, especially
his ram. Sections of the floor will be destroyed during
this battle and the lava below will be exposed so watch
out when you hover because you might just land in some
lava if you're not careful.
While he is in his drill form, he can be hit, but it
is a gamble since you need to hit him on the sides in
order to damage him. It's worth trying if you have the
grenade launcher because of its spreading explosives,
otherwise keep avoiding him until he transforms back
to VS form. The grenade launcher is an excellent weapon
to use in conjunction with the EM laser for this battle
for some major damage. If you're ever one foot, be sure
to grapple up to the side ledge with the tanks and get
in another VS suit. Fighting this boss without a VS
suit is basically suicide since he is so big.
This fight basically remains the same as it did with
all the other difficulties. Make sure to bring a PTX-140
Vital Suit since there is not one in the room. Equip
a VS rocket launcher on one side and find the grenade
launcher on the circular platform in the boss room then
dual wield them to bring him down quick. The grenade
launcher can easily be your main savior. One grenade
can sometimes take off extreme damage even when he is
in tank form. Make sure to blast the thermal energy
tanks up on the high platform if your T- ENG starts
to get low. Grab VS weapons while on foot if you get
thrown out of your Vital Suit. Just because he has knocked
you out of your Vital Suit doesn't mean that the battle
is over, especially if you grab the grenade launcher
while on foot.
|