| WALKTHROUGH
- Mission 05 - Mountain Route 2
"Proceed across the second mountain route.
When you reach the tunnel, pass through it to reach
the other side of the mountains."
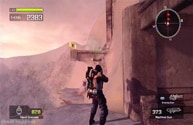
Move forward and start blasting the Spider Akrid hive
up on the mountain to keep their numbers small then
kill off some of the remaining Spiders to thin them
out a bit. A giant moth will eventually fly by the area
and create a wind gust. This wind gust will knock you
and the Spiders down the side of the mountain if you
don't take cover in an alcove or room along the mountainside.
Whether it is a room or two pieces of debris, you must
take cover somewhere or the gust will knock you back
down to the bottom. Keep in mind that avalanches will
occur frequently while moving up the side of the mountain,
so you will need to quickly take shelter in one of the
rooms up above - roll or jump quickly through the doorway.
| |
 |
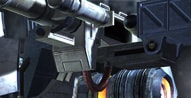
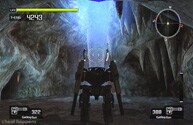
Go ahead and start to grapple and climb up the mountain
on the left side. Grapple to the metal platform closest
to the ground then pull yourself up and look off to
the right to see a concrete ledge. Grapple onto the
concrete ledge then seek cover in the alcove to the
left as the avalanche starts and grab the MACHINE GUN
inside. Run back outside and activate the DATA POST
(1/3)  on the concrete ledge. Grapple to the next small concrete
ledge then blast the hive that the Spiders are spawning
out of. There will be an avalanche on the side with
the hive, so don't race over to the sheltered area beyond
it just yet. When the avalanche clears, run into the
alcove to the side and pick up the HAND GRENADES and
the ENERGY GUN. Run back outside when the moth leaves
and walk back over to the left side (where the hive
on the wall is) and grapple up to the ledge up above.
Run directly into the room in front of you since some
boulders will start to roll down the side of the mountain.
The room will have a Spider Akrid hive in the portion
that you must enter from so blast the barrels in the
back and the hive to quickly get rid of it. Grab the
MACHINE GUN in the back and run back out when the moth
passes by.
on the concrete ledge. Grapple to the next small concrete
ledge then blast the hive that the Spiders are spawning
out of. There will be an avalanche on the side with
the hive, so don't race over to the sheltered area beyond
it just yet. When the avalanche clears, run into the
alcove to the side and pick up the HAND GRENADES and
the ENERGY GUN. Run back outside when the moth leaves
and walk back over to the left side (where the hive
on the wall is) and grapple up to the ledge up above.
Run directly into the room in front of you since some
boulders will start to roll down the side of the mountain.
The room will have a Spider Akrid hive in the portion
that you must enter from so blast the barrels in the
back and the hive to quickly get rid of it. Grab the
MACHINE GUN in the back and run back out when the moth
passes by.
 |
|
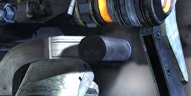
Look to the right after you exit from the room and
grapple to the small ledge to the side with a MACHINE
GUN on it.
I wouldn't recommend trying to get that machine gun
since this ledge is very narrow. When you grapple, hold
the left analog toward the ledge past it to land on
it instead. Boulders will fall from the side of the
mountain so be prepared to dodge them. Throw a grenade
into the room ahead since it will be covered with Akrid
and explosive barrels. Duck into the room when the moth
flies by and grab the GUN GRENADES and the MACHINE GUN
inside. Walk back out onto the ledge when the coast
is clear and blast the hive on the right mountain wall.
Pick up the LASER RIFLE and drop the energy gun, then
grapple up to the next ledge above. The laser rifle
is the best weapon to use if you want to defeat the
Giant Mouth - read below. You'll find some more GUM
GRENADES and another MACHINE GUN inside the room on
the ledge. You need to grapple to the next ledge up
above the current one. It's a little hard to get the
camera adjusted just right, but you should be able to
walk outside of the room and turn right while looking
up for a perfect angle. Walk along the snowy ledge and
move very fast over to the path on the far side so you
can take cover against the mountain wall to avoid the
moth when it swoops by again. Run into the cave.
| |
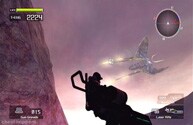 |
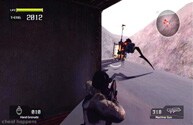
Fighting the Giant Moth is optional, but you will gain
an Achievement for killing it.
Grab the laser rifle while climbing up the side of the
mountain then get in between the mountain walls on the
snowy ledge before running into the cave in the back
and wait for the moth. The moth will not be able to
hit you with the gusts of wind from its wings as long
as you stay in this area. When it flies overhead, shoot
the bottom part of its body. It should fall after a
few hits depending on the difficulty. The moth will
shower the area with T-ENG then eventually crash into
the side of the mountain when it dies. The Achievement
will be earned after this level is finished.
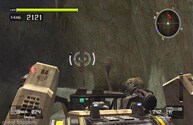
Still got that laser rifle? Good. Walk further into
the cave and grab the MACHINE GUN off to the side then
drop the laser rifle for a bit. Thin out the Trilid
Akrid in the distance just a bit so they don't constantly
dive toward you. A Wasp Akrid will appear among the
Trilid. This Akrid will buzz around then stand still
to shoot a projectile at you. Pick up the laser gun
and charge while waiting for him to stand still then
blast him in his heat source on his lower body when
he does. It should only take about two hits. If it moves
around too much, shoot one set of its wings on either
side. This will cause him to fall to the ground on his
back exposing his heat source. Wasp Akrid are basically
dead once they can no longer fly - keep this in mind
when they start appearing in groups. Move down the left
side and activate the DATA POST (2/3).
There's an ENERGY GUN further down the left side. Your
destination is up on the right side, but you can explore
a bit down below by jumping down the ledges on the left
side. This will help you to gain some more thermal energy
and find some HAND GRENADES, 2 SHOTGUNS, a GATLING GUN,
a VS SHOTGUN, and some GUM GRENADES. There is also a
GTF-11 Vital Suit at the bottom.
If you still have that laser gun from outside then equip
it to the VS suit along with a VS shotgun for some ultimate
firepower!
 |
|
While moving up the right side, two Spore Akrid will
surface from the ground.
These Akrid will shoot spores from their top circular
portion that will rain down upon the area around them.
Shoot them in their top bud portion to kill them quickly.
Get in the standard GTT-01 Vital Suit if you didn't
get the better VS from below. Try not to shoot the boulders
while moving along the side or the rocks will roll down
the ledges and damage your VS. You'll come across two
MACHINE GUNS on your way around the ledge. More Spore
Akrid will appear on the other side. Shoot the Trilid
hive up above the boulders but don't shoot the boulders
or they will only damage your VS as they roll toward
you. Keep moving around the side of the ledge and grab
the MACHINE GUN and GATLING GUN up ahead. Eventually
some more Wasp Akrid will fly up to you and attack.
Some more Spore Akrid will burst up from the ground
further ahead. Blast the Wasps with the laser gun or
gatling gun. You can also blast the red stalactites
for some extra T-ENG. Even more Spore Akrid will appear
further up the ledge. Grab the VS SHOTGUN along the
way.
| |
 |
Blast the Trilids as they dart out of the tunnel to
the side then have a shot ready for the Wasp Akrid that
will attack from the entrance. Walk into the tunnel
and shoot the stalactites and eggs for a major T-ENG
boost. Try not to shoot the boulder on the way up the
steep part of the tunnel. Hop into the GTF-11 Vital
Suit inside of the tunnel and equip it with the laser
rifle or VS shotgun.
Charge a laser blast and shoot the Wasp Akrid perched
on the ledge in the distance to kill him.
Activate the DATA POST (3/3) right outside the tunnel
then jump and hover with the VS over to the ledge on
the right side. Grab the GATLING GUN while moving into
the tunnel if you need it then drop through the next
few holes in the back of the tunnel.
 |
|
You'll enter a segment of the cave with a frozen column
in the middle of the room.
There's a standard GTT-01 VS inside over to the right.
Enter the tunnel to the right to find a room with tons
of eggs and some HAND GRENADES, an ENERGY GUN, and a
GATLING GUN. You'll need to pick up the gatling gun
and bring it toward the middle of the room to equip
it to your VS. Enter the tunnel across from the current
tunnel to find a GTB-22 VS suit along with a MACHINE
GUN and another GATLING GUN. I would recommend entering
the GTB-22 model so you can move about more freely -
this will help for the boss fight to come. Equip it
with a laser gun and a gatling gun. Go back into the
area with the frozen column and blast the Akrid seal
on the entrance of the tunnel beside the standard VS
then fall down the hole inside.
| |
 |
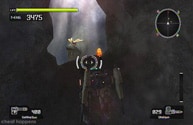
This boss has tons of weak spots on him making this
fight not as bad as the last, but still challenging.
The main thing to keep in mind during this battle is
that the closer you stand to him, the less likely he
is to hit you. Like the last battle, you really need
to know the boss' moves and how to avoid them to win:
1) The Chryatis will lean his right or left arm back
and swing it toward you horizontally.
How to avoid: Jump right before he swings his arm.
2) The Chryatis will lean his right or left arm back
and swing it toward you vertically. He will sometimes
do this three times in a row and will usually get his
claw stuck in the ground on the third time allowing
you to blast him.
How to avoid: Move/Dash to the side. Remember that
he will always delay the third strike to throw off your
timing.
3) The Chryatis will lean his head back and breathe
a trail of ice in front of him.
How to avoid: Move/Dash to the side.
4) The Chryatis will bang his claws against the ceiling
and make boulders fall along the outer area of the room.
How to avoid: Move/Dash to the side. You can also run
directly toward him since the boulders will only fall
in the outer area.
Most of his attacks can be avoided easily, but some
of them require a bit of extra maneuvering. The main
focus of the battle is to stay in the VS for as long
as possible. There is an extra GTF-11 Vital Suit, a
GTB-22 Vital Suit, and plenty of ammo lying around,
so you need to make good use of them. Stay right next
to him if he ever destroys your VS and find another
VS around the area.
As mentioned above, there are several heat sources
on the Chryatis and hitting these heat sources enough
will cause him to fall over on his stomach and lift
his head up. His glowing eye is the major source for
damaging him. To successfully hit him, shoot either
the top part of both of his arms or the glowing section
of the appendages on the sides of his body. I would
recommend standing right next to him and moving to either
of the sides while shooting one set of appendages with
a gatling gun. This way, you'll avoid most of his attacks
while you work on one set. The appendages are very weak
and will fall to only a few gatling gun shots. Once
one of his arms has been shot off or all the appendages
on one side have been shot off, he will fall flat on
his face and lift up his head, exposing his glowing
eye. Charge a shot with the laser gun or fire a rocket
and shoot him directly in the eye to really damage him
and spread several pieces of T-ENG from his head. Also,
one grenade blast will severely damage the eye more
than any other weapon if you hit it just right. He will
fall down again and lift up his head once again. Fill
him full of laser blasts or other weapon fire while
he is down until he raises up again. He will regenerate
whatever part of his body that you shot off and go back
to attacking normally. It is very important that you
injure him badly enough to where he drops T-ENG since
you will need that T-ENG to shoot the laser gun and
damage him badly. There are also three stalactites hanging
from the ceiling directly over him that can be shot
down and will damage him if he is underneath that particular
stalactite. I would suggest saving them for the last
few final hits. Toward the end of the battle he will
start to combine moves aggressively and start a whole
new move:
5) The Chryatis will fire out an ice ray horizontally
with his mouth.
How to avoid: It is best to jump and hover in the air
when he does this. It can be escaped by moving toward
him also but you must remain close.
Keep shooting him with the gatling gun in his heat
sources then blast him with a big weapon such as the
laser gun, rocket launcher, or grenade launcher whenever
he falls. The rate of shots is much faster with the
laser gun allowing some incredible damage when he falls.
Bring a Vital Suit with you, preferably the GTB-22
suit. Equip it with a gatling gun and a rocket launcher.
The most important aspect of this fight is that you
stay near him and circle him while blasting the appendages
on his sides (with a gatling gun) to make him lean over.
Once he leans over, fire a rocket into his eye then
fire another when he falls to the ground. He will be
coughing up a bunch of thermal energy with each major
hit that you deal to him. The only hard part is when
you run out of ammo and are forced to venture away from
him to find another weapon. He is a total monster at
long distance, so make sure that you get back up to
him quickly. You may want to cripple him by shooting
him in the eye once so his head falls to the ground
then go for another weapon while he recovers. There
is another Vital Suit in the room, but that doesn't
mean you shouldn't bring one. There is a grenade launcher
in the room if you can find it. Don't forget to shoot
the stalactites above him for some possible damage.
Constantly stomp on the Akrid eggs around him to gain
some extra thermal energy. Never leave his side unless
you are forced to.
|