| WALKTHROUGH
- Mission 04 - Mountain Route 1
"Climb the first mountain route to reach the
peak. You will find the way to the next area from there."
Several Spider Akrid will be lurking along the walls
of the path ahead. Grapple up to the MACHINE GUN  on the left then start blasting the hives and Spiders
protruding from them. Once you reach area with a SHOTGUN,
a giant moth will fly overhead and unleash several explosive
eggs.
Look above and try to avoid them or shoot them while
continuing to fight off the current Spider Akrid around
you. The giant moth will swoop by the valley quite a
few times. There are some boulders on the side of the
mountains above many of the hives that can be shot to
take out the hives and a few Spiders. A Dongo will roll
down the path as soon as you turn to the right, so be
ready to shoot him with your shotgun. Look to the left
right after the Dongo rolls and grapple up to the side
of the mountain for a MACHINE GUN and a pickup of GUM
GRENADES.
on the left then start blasting the hives and Spiders
protruding from them. Once you reach area with a SHOTGUN,
a giant moth will fly overhead and unleash several explosive
eggs.
Look above and try to avoid them or shoot them while
continuing to fight off the current Spider Akrid around
you. The giant moth will swoop by the valley quite a
few times. There are some boulders on the side of the
mountains above many of the hives that can be shot to
take out the hives and a few Spiders. A Dongo will roll
down the path as soon as you turn to the right, so be
ready to shoot him with your shotgun. Look to the left
right after the Dongo rolls and grapple up to the side
of the mountain for a MACHINE GUN and a pickup of GUM
GRENADES.
When you make another turn a DATA POST (1/4) will be
on a raised area to the right. Pick up the MACHINE GUN
nearby and shoot the boulders above the Akrid hive up
ahead to keep them from spawning as much. There is another
MACHINE GUN further ahead and to the left a bit followed
by a ROCKET LAUNCHER under some snow at the end of the
path. Drop down into the nearby hole near the dead Snow
Pirate to escape the constant dive bomb of explosive
eggs.
Don't automatically slide down into the building. Take
a look around the area! Fire at the hives around the
room (on the ceiling and floor) and destroy them all
from the safety of your suspended cable. Aim for the
explosive barrels and toss grenades down at them. Be
sure to grab both pickups of GUM GRENADES, both MACHINE
GUNS, the GATLING GUN, and the HAND GRENADES if needed.
Walk into the hall up ahead where you'll find another
MACHINE GUN. Grapple to the floor above and collect
the PLASMA GRENADES near the corridor.
The corridor will lead to a big room with Snow Pirates.
Find the Snow Pirate with the rocket launcher on the
crane (in the middle) and kill him first. One enemy
Vital Suit equipped with a rocket launcher will be to
the right as you enter and another enemy Vital Suit
equipped with a shotgun will appear from behind the
crates in the left corner. Throw plasma grenades at
the enemy Vital Suits and hit them with rockets while
they are stunned. Two Dongos will roll down the middle
part of the room toward the Snow Pirates when you get
near the stack of crates. Activate the DATA POST (2/4)
near the left set of crates when the coast is clear.
Several item pickups are lying around the room including:
GUN GRENADES, HAND GRENADES, MACHINE GUNS, and SHOTGUNS.
Don't forget to shoot the large black tanks in the room
for some extra T-ENG as well.
 |
|
Enter the small corridor through the doorway on the
top of the raised area on the right side.
Turn the corner at the end of the corridor and the giant
moth outside will fly by and break the windows. The
air gust will always knock you back even you move back
down the corridor. Drop to the floor below the broken
window. Trilid Akrid will start to swoop down at you
at this point. A few Snow Pirates will also shoot from
a ledge on the right side. If you have a rocket launcher
then use that to kill them quickly and take out the
Trilid nests as well. Use the MACHINE GUN to the side
to thin out of a few of the Trilids. Fall down to the
metal lift on the right side and it will start automatically.
Shoot at the Snow Pirates and Trilid while moving if
there are any left. The lift will eventually get damaged
by some of the Explosive Akrid, so you'll need to grapple
to the snowy ledge to the right side in order to continue.
The lift will always fall so grappling to the mountain
ledge is necessary to continue.
Blast the Explosive Akrid from the safety of the ledge
and try to destroy the remaining Trilid hives (there's
two of them) while moving up the mountainside. You'll
come across a metal doorway at the top of the mountainside.
Ready a shotgun and blast the Trilid as they dive out
of the doorway in a group. Finish off any remaining
Trilid once you get inside of the room through the doorway
then activate the DATA POST (3/4) off to the left.
Pick up the MACHINE GUN then get inside of the Vital
Suit. This is a GTB-22 model that has the ability to
double jump (A after normal jump), long jump (Y; then
Y to cancel while in the air), and lay out a smoke screen
(X). Grab the LASER RIFLE before long jumping up to
the platform above.
Clear out the Trilids up ahead then look up and shoot
the Explosive Akrid and other Trilids up above. Get
out of the VS and pick up the MACHINE GUN and GUM GRENADES
if needed then use the VS to long jump up the platforms.
You'll find an ENERGY GUN on the platform above and
a pickup of GUM GRENADES if you go across the narrow
ledge. On the ledges above there will be 2 GATLING GUNS,
2 ROCKET LAUNCHERS, 2 MACHINE GUNS, HAND GRENADES, PLASMAS
GRENADES, and a VS ROCKET LAUNCHER. Stand on the very
top platform, right above the VS rocket launcher pickup
and long jump through the hole in the roof. Step toward
the Data Post off to the side. An avalanche will happen
that will bury the hole in the roof that you just jumped
through.
| |
 |
Get out of your VS and activate the DATA POST (4/4).
Dig up the VS and the LASER RIFLE from the two mounds
of snow. It comes equipped with a missile launcher and
a gatling gun, which will be perfect for the upcoming
boss battle. Jump on top of the boulders that fell on
the rooftop exit then jump up the side of the mountain.
You will see a big open area with plenty of item pickups
in the distance along with a steep hill in the middle.
Walk toward the new area.
 |
|
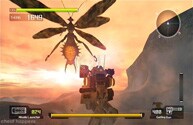
Shoot the middle glowing section of the wasp to damage
it. You can actually shoot this boss' wings with a gatling
gun and make him fall to the ground so that you can
unload on his heat source, but I would suggest taking
nearly half of his HP bar before trying this since he
will get extremely aggressive when he only has half
of his life left. Concentrate on one side of his wings
and the boss' wings will start to show signs of damage
on that side. He will eventually fall to the ground
and land on his back, exposing his heat source in full
view. He will regenerate his wings, but it takes him
about 15 seconds.
In order to defeat this boss you must learn his patterns
of attack. Here is a list of his attacks:
1) The boss will fire down a vertical line of fireballs.
How to avoid: Move to the sides.
2) The boss will fire down a horizontal line of fireballs.
How to avoid: Move away from the boss or jump. Sometimes
moving toward him will cause them to fly over you.
3) The boss will release some explosive flying insects
that will fly directly toward you in a group.
How to avoid: Double jump when they are about midways
toward you.
4) The boss will start to fly backward then suddenly
lunge straight toward you.
How to avoid: Double jump as soon as the boss is about
to lunge.
If you can learn to avoid all of those attacks, you
will be fine for the first half of the battle. While
on foot, a single roll to the side will dodge all of
his attacks mentioned above. To hit him while he flies,
you must wait until he attacks. He will always stop
and float in the air for each of the above attacks.
The only catch is to not attack him while he prepares
his lunge attack or you will be eating his back end
through your Vital Suit. Take about half of his life
then start to work on one set of wings with the gatling
gun to make him fall. Try as much as you can to finish
him off while he remains on the ground. He will hover
in place for a few seconds after getting up with regenerated
wings as well.
Once half of his life is taken he will perform his
lunge attack (attack #4 above). He will take quite a
while to recover from the lunge attack so take that
time to fill him full of charged laser blasts and missiles.
When he recovers from the lunge attacks he is about
to go crazy with his attacks and bombard you with fireballs.
During this wave of attacks it is best to keep moving
toward him no matter where he flies to. Stay moving
toward him and many of his attacks will go right over
your VS or fall behind it. The wasp will perform a move
where he will send a single fireball into the air and
that fireball will explode into a bunch of smaller fireballs
and rain down upon your VS - keep moving toward him
and the fireballs should land behind you. He also still
sends out the flying insects occasionally. He will eventually
stop during his aggressive attacks and spend quite a
while hovering in the air to recover from his onslaught
and that is when you should nail him.
This boss is very hard outside of the VS that you enter
this area with. There is a standard VS suit to the side,
but it is much slower, so you will wind up getting hit
a bunch while using it. You can also jump back down
to the VS down the mountainside that you left. He can
still be taken out on foot, but you will have to roll
constantly, especially when he gets super aggressive
toward the end of the battle. Listen for the sounds
that he will make before he does each attack if your
camera ever loses him then roll immediately. Use VS
weapons while on foot to blast him when he has to recover.
Try to bring the very first GTB-22 Vital Suit with
you for this fight since the missile launcher on the
other cannot be detached. Have a gatling gun on one
side and a VS shotgun on the other. The VS shotgun should
be on the left side of the area as you make your way
to the boss fight open area. Keep blasting one set of
wings on either of boss' sides with a gatling gun until
he falls. Make sure to stay near him when you think
he is about to fall. Run over to him and blast his heat
source with continuous VS shotgun blasts and gatling
gun blasts until he flies away. Don't forget that you
can still hit him while he hovers right before flying
away. The blasts will severely damage him or possibly
kill him. Don't forget to shoot the tanks around the
area and also remember that you can move back down the
mountainside and get the VS in the snow.
|