| WALKTHROUGH
- Mission 03 - Crossing the Plains
"Find the source of the thermal energy signature
deep in the snow plains. Proceed with caution as there
are rumored to be massive Akrid inhabiting the area."
 |
|
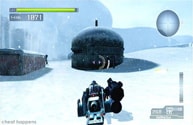
Shoot the Trilid Akrid in the distance and destroy
their hive. Choose one of the GTF-13M Vital Suits next
to the large crate ahead and thin out the Trilids in
the distance by destroying their hive. Scope out the
DATA POST (1/5) on the dome-shaped building then grab
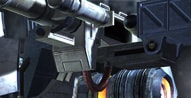
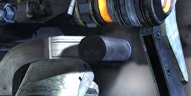
the MACHINE GUN on the way up to activating it.  Check in the snow behind the building with the Data
Post on top to find a ROCKET LAUNCHER underneath the
snow - there's also an ENERGY GUN nearby. Dig the VS
ROCKET LAUNCHER out of the deep snow on the right side
then equip it to a VS. Aim for the hives on the wall
in the distance and destroy them. On the way toward
the hive you will find some DISC GRENADES buried under
the snow. Walk behind the dome-shaped building that
Wayne started at and grab the MACHINE GUN in the deep
snow. Scope out the next dome-shaped building and grab
the ROCKET LAUNCHER that is buried in the mound of snow
next to it.
Check in the snow behind the building with the Data
Post on top to find a ROCKET LAUNCHER underneath the
snow - there's also an ENERGY GUN nearby. Dig the VS
ROCKET LAUNCHER out of the deep snow on the right side
then equip it to a VS. Aim for the hives on the wall
in the distance and destroy them. On the way toward
the hive you will find some DISC GRENADES buried under
the snow. Walk behind the dome-shaped building that
Wayne started at and grab the MACHINE GUN in the deep
snow. Scope out the next dome-shaped building and grab
the ROCKET LAUNCHER that is buried in the mound of snow
next to it.
Keep in mind that there are more Data Posts out on
the snowfield other than the ones that I have listed.
Several of them are spread around the middle and outer
areas of the field.
| |
 |
Your destination lies outside the metal structures
forming a barrier on the south side (look at your map).
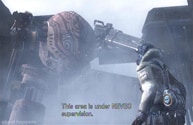
Once you head out there, the ground will start to shake
and a giant Akrid worm will rise up out of the sand
and start to attack.
There is no need to defeat this worm, but an Achievement
can be gained by defeating him - see below. From here
on out, it is a race to the destination between you
and the worm. The worm will destroy any VS that you
bring out into the snowfield almost immediately, so
you have to run on foot. It's good to activate the Data
Posts along the way so you'll know what direction to
run to next. Scope out the nearest DATA POST (2/5) and
try to activate it, if you can't activate it then don't
worry about it. Keep running until you see another DATA
POST (3/5). Activate it or keep running toward the large
building in the back. Run up the stairs of the side
building and activate the next DATA POST (4/5). Grab
the MACHINE GUN beside the Data Post and head toward
the direction that the light points on the Data Post.
Dig up the ROCKET LAUNCHER from the mound of snow along
the way. Try to stay against the mountain wall until
you reach a fenced area. Keep moving along the fenced
area and you will reach another DATA POST (5/5). The
Data Post light will point toward the warehouse building
up ahead. Approach the warehouse for a cutscene.
 |
|
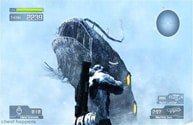
The worm has green heat sources on both of his sides
and they can basically only be destroyed with a rocket
launcher. Destroying all eight heat sources on his sides
will kill him, but it is not mandatory to shoot them
all. Shoot all the Trilid that he unleashes before trying
to hit him since they will get in the way of your shots.
If you keep destroying them, they will eventually stop
spawning from the worm. The only time that the worm
will pause is right after lunging after you to bite
you. This move is actually a one hit kill if he catches
you. Roll out of the way during his lunge and turn to
face him while he recovers in order to get a perfect
angle to hit his heat sources. He will remain stunned
for quite a while at that time. Keep in mind that there
are plenty of other Data Posts that I did not list that
could help you gain some more thermal energy during
this fight.
As mentioned above, you do not have to destroy all
eight of his heat sources to kill him though. Destroying
the heat sources will take major damage, but it's not
required that you destroy each one. If you can find
enough firepower in the snowfield, he can be killed
just by simply hitting him with heavy weapons anywhere
on his body. I would suggest using VS weapon (rocket
launchers, grenade launchers) off of the abandoned Vital
Suits in the snowfield since they will take more damage
than the standard rocket launcher. Make sure that he
is not about to lunge after you while you reload a VS
gun since they take quite a while to reload. The music
will stop after the worm is killed and he will leave
behind a big supply of T-ENG. You'll likely kill him
before you know it since his death is very sudden. He
will surface then shatter when he dies. Eventually the
music will start back after a few seconds then another
worm will surface. Remember that only one has to be
killed and you need to beat the level in order to gain
the achievement.
Wayne will start out right next to a Vital Suit that
he ran to in the cutscene prior to this battle. Get
in the VS immediately - it comes equipped with a rocket
launcher and a gatling gun. Basil's VS has a laser that
will cause extreme damage to your current VS suit. Watch
for the right gun on the enemy VS to open then immediately
jump and hover to avoid the blast. The enemy VS will
fire out a laser horizontally toward your location but
it will miss while you're hovering in the air. Use that
chance to fire at it with the gatling gun and shoot
a rocket at it while hovering. The laser will always
start from the right side and move left then back to
the right. The laser will take off half of your VS's
life gauge since it will hit twice if the first hit
connects.
To dodge the rockets you will have to listen for them.
They make a noise each time the VS shoots them out and
you will need to learn that noise and dash to the side
or jump each time you hear it. The enemy VS usually
stops when it fires a rocket, but that is not always
the case. It will sometimes shoot rockets and fire a
laser at the same time. The enemy VS can basically run
circles around yours so you must learn to dodge each
of its attacks appropriately. The smoke from the constant
rocket launchings will be in the way sometimes to where
nothing can be seen, so you will have to listen for
its attacks and jump when in doubt. There is a second
VS on the side of the warehouse and a few VS weapon
pickups scattered around the area. Keep in mind that
you can exit the warehouse through the hole on the side
find some more weapons and another VS at the end of
the snow path. This fight can be fought on foot, but
it is much harder. You will need to roll out of the
way (Push in on left analog + press a direction + A)
of each attack. The main hard part about fighting on
foot is attacking since you will want to use rockets,
but Wayne will be left wide open while shooting a rocket
and while reloading.
You'll start out next to a Vital Suit just like before
but remember that that is the only Vital Suit that you
will get. Fight her just like before by jumping to avoid
the laser and moving to the sides to avoid her rockets.
Blast the tanks found around the room for some extra
thermal energy and find some extra VS rocket launchers
around the room when the first one runs out. Dual wielding
rocket launchers is a good idea. Bring a normal rocket
launcher with you just in case she destroys your VS
when she only has a little bit of life left. Roll toward
the opposite direction the laser is moving (toward the
laser) to avoid it while on foot.
|