In the main menu of Halo 3, you will find the following
options.
- Start Solo Game
- Campaign
- Matchmaking
- Custom Games
- Forge
- Theater
And each will take you to their own lobby. Except the
first one. That will start you off with a solo game.
So, with a new game, comes new stuff. There are new
characters, new weapons, vehicles and something completely
different, something called 'equipment'. (Explained
later)
There are also new features in the game called "Forge"
and "Theater". Both forge and theater have
a different control layout, explained below. More information
regarding forge and theater is in their own section.
In this section, you will find a detailed list of all
the main characters and Covenant Species, all weapons,
vehicles and equipment.
1 - Controls
| A |
Jump |
| X |
Use Equipment |
| B |
Melee |
| Y |
Swap Weapon |
| RB |
Action / Reload Primary Weapon |
| LB |
Dual Wield / Reload or Swap Secondary
Weapon / Choose Grenade |
| RT |
Use Primary Weapon |
| LT |
Throw Grenade / Use Secondary
Weapon |
| D PAD |
Flashlight [UP] / Push to Talk
[Multiplayer] |
| LEFT ANALOG |
Move / Strafe / Press to Crouch |
| RIGHT ANALOG |
Aim / Turn / Look / Press to Zoom |
| BACK |
View Multiplayer Score / Carnage
Report |
| START |
Pause / Settings |
| 'X' |
Xbox Guide / Friends List |
| A |
Pick Up / Drop Item |
| X |
Inventory / Item Options |
| B |
Hold to Drop Selected Item |
| Y |
Delete Item |
| RB |
Move Up |
| LB |
Move Down |
| RT |
Hold to Rotate Selected Item |
| LT |
Thrust |
| D PAD |
Switch Between Player and Editor
Mode [UP] |
| LEFT ANALOG |
Move / Rotate Selected Item |
| RIGHT ANALOG |
Look / Rotate Selected Item |
| BACK |
View Multiplayer Score / Carnage
Report |
| START |
Pause / Settings |
| 'X' |
Xbox Guide / Friends List |
| A |
Play / Pause |
| X |
Hide / Show Control Pad |
| B |
Hide / Show HUD |
| Y |
Switch Between Flying Camera and
Player Camera |
| RB |
Move Up [Flying Camera] |
| LB |
Move Down [Flying Camera] |
| RT |
Slow Motion / Fast Forward |
| LT |
Thrust [Flying Camera] |
| D PAD |
Switch Players [Player Camera] |
| LEFT ANALOG |
Move Camera / Press to Pan [Flying
Camera] |
| RIGHT ANALOG |
Look / Rotate Camera [Flying Camera] |
| BACK |
View Multiplayer Score / Carnage
Report |
| START |
Pause / Settings |
| 'X' |
Xbox Guide / Friends List |
2 - Characters
There are many key characters in the Halo Universe.
A detailed list of them are below.
| 
The Chief is the last of his kind, an elite group
of human soldiers who were trained as children,
and designed for war. He is encased in what is
known as MJOLNIR Mark VI battle armor which gives
his already heightend strenght, speed, etc, and
extra boost. Because of his years of military
experience and MJOLNIR battle armor, he is unparralleled
to any other human. |
| |
|
A disgraced Commander in the Covenant fleet. When
he failed to protect Halo (in the first game) he
was named a heretic, sentenced for death. However,
he was given the chance to become an Arbiter to
save what little reputation and honor he clutched
onto. Arbiters in the Covenant history were meant
to go on "suicide missions", however,
during the Arbiter's travels and missions, he learns
that all of the Covenant teachings were false. This
in turn caused his people to fall away from the
Covenant and create an unprecedented schism in the
Covenant. The Sanghelli (Elites) now fight with
the humans. |
| |
|
The UNSC's most creative, intelligent and sophisticated
Artificial Inteligence (AI). Cortana was originally
an AI for the Pillar of Autumn, but she went into
the posession of Spartan 117 at the start of the
first game. Ever since then, the bond between
the two grew stronger and stronger. Throughout
the game, you will be reminded that Cortana is
still missing when the Master Chief left her behind
at High Charity. You must get her back. |
| |
|
The leader of the Covenant. Blinded in his beliefs
about this "Great Journey" he will stop
at nothing to achieve his goal. Because he believes
the Humans to be a disgrace to his "Journey",
he uses his vast armies to exterminate them. |
| |
|
The one-of-a-kind virulent Flood form which spreads
and collects sentient creatues. Now that it has
reached it's limit of collection, it has become
Gravemind and will not stop to consume every living
being in the galaxy. Gravemind now roams freely
aboard High Charity. |
| |
|
Sergeant Major Avery Johnson is one battle hardend
Marine, one of the bests. He knows the Master
Chief like no other soldier does as throughout
their battles and travels, they stuck close together
from the first game, to the last. |
| |
|
Daughter of Captain Keyes, Miranda now plays a
major role in the defense of Earth against the
Covenant. |
| |
|
Admiral of the UNSC. He holds the highest rank
as a human. Introduced in Halo 2 and continues
on in Halo 3. |
| |
|
Introduced in Halo: Combat Evolved, 343 Guilty
Spark served as the monitor for Installation 04
(the first Halo Ring). Known otherwise as "The
Oracle" or simply "Spark", 343
Guilty Spark plays assists the Master Chief in
Halo 3, yet has an important role in all three
games. |
| |
|
These small creatures show a threat in large groups,
but alone or even in small groups, the pose a
small threat. They are also dependant on a leader
in battle. If that leader is killed, they will
panic and run away. |
| |
|
Creatures of superior natural vision and dexterity.
Therefore, they are used mainly as sharpshooters
in the Covenant armies. Many carry energy shields
because of their weak physical build. |
| |
|
Flying little buggers in the Covenant armies.
These Drones serve as a great asset to the Covenant
because of their ability to fly overhead in battle. |
| |
|
The Brutes assumed command of the Covenant armies
in a quick change of hierarchy because of the
Elite's inability to protect one of the High Prophets
from the Master Chief. They are naturally strong,
dangerous and prone to acts of berserker violence. |
| |
|
The Elites were the ruling class of the Covenant
before the change in hierarchy. They hold to their
personal honor, and honor in battle. Because of
the schism in the Covenant, a hatred between the
Elites and the Prophets was born. This in turn
created an alliance between the Elites and the
Humans. |
| |
|
Hunters are comprised of a wormlike entities which
create a thick armor-plated form. Always found
to be fighting in pairs, the Hunters make a deadly
threat to ground forces with their massive shield
and plasma cannon. |
| |
|
The Flood are a parasitic alien life form which
seek to infect and mutate (or kill) any and all
sentient life they encounter. The Flood come in
many different shapes and sizes, (more so than
the first two games) all of which pose a threat
to you throughout the game. Not only are they
responsible for the deaths of countless lives,
but they are also responsible for the deaths of
their mysterious creators, the Forerunners who
lived long....long ago not in a galaxy far...far
away... |
| |
|
3 - Weapons
The Humans can hold their own during ground engagments
with the Covenant because of a large arsenal of weapons.
But if outnumbered, that is another story. The Covenant
is only so successful because of superior numbers of
troops,
and space technology. All the Covenant has to do is
destory any planetary defenses and destory the planet
with plasma
from space (AKA: Glassing the Planet).
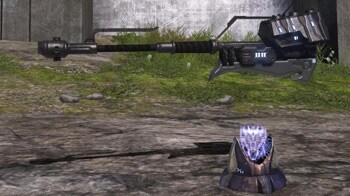
Halo 3 introduces "Support Weapons". These
weapons are very powerful, but they slow down the player
and they put you in third-person while carrying them.
If you find a turret, like a machine gun, plasma cannon
or missle pod, simple grab
it (RB), and detach it (B).
The following is a list of all weapons, seperated into:
Human, Covenant, Brute, Forerunner and Grenades.
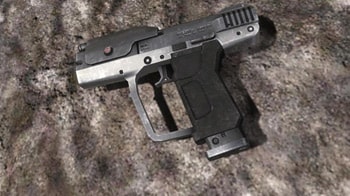
Humans
Magazine: 8 rounds.
Rate of Fire: Semi-Automatic, 2 rounds per second
Damage per hit: High
Scoping: None
Dual Wieldable: Yes
Kill: 4-6 direct head shots |
 |
| |
|
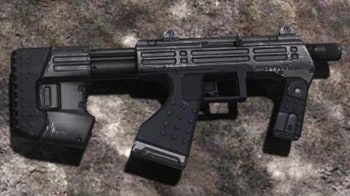
Magazine: 60 rounds
Rate of Fire: Automatic
Damage per hit: Medium - Low
Scoping: No
Dual Wieldable: Yes
Kill: Rapid fire to target at close range |
 |
| |
|
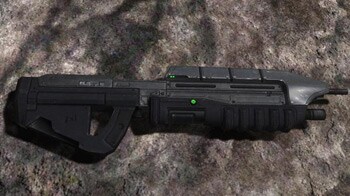
Magazine: 32 rounds
Rate of Fire: Automatic
Damage per hit: Medium - Low
Scoping: No
Dual Wieldable: No
Kill: Direct fire to target at close enough
range |
 |
| |
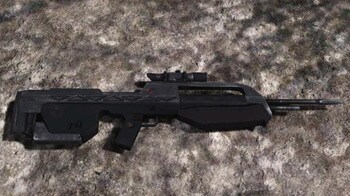
|
Magazine: 36 rounds
Rate of Fire: Semi-Automatic, three-round bursts
Damage per hit: Medium
Scoping: Yes (2x)
Dual Wieldable: No
Kill: Instant with headshot to a shieldless
enemy |
 |
| |
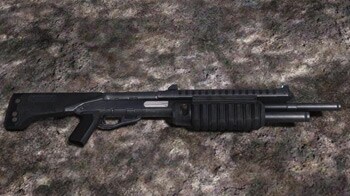
|
Magazine: 6 shells
Rate of Fire: Moderate
Damage per hit: Extreme - Low
Scoping: No
Dual Wieldable: No
Kill: Instant at close range |
 |
| |
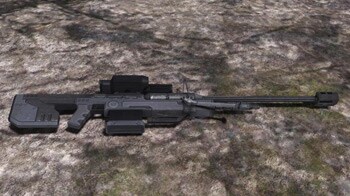
|
Magazine: 4 rounds
Rate of Fire: Semi-Automatic
Damage per hit: Extreme - High
Scoping: Yes (5x - 10x)
Dual Wieldable: No
Kill: Instant with headshot or two body shots
to a shielded enemy |
 |
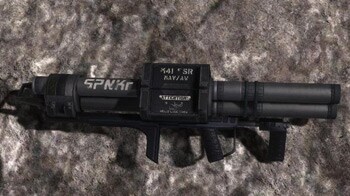
| |
|
Magazine: 2 rockets
Rate of Fire: Moderate
Damage per hit: Extreme - Medium
Scoping: Yes (2x)
Dual Wieldable: No
Kill: Instant with direct or close hit |
 |
| |
|
Magazine: 5 shots/charge
Rate of Fire: Low
Damage per hit: Extreme - High
Scoping: Yes (2x)
Dual Wieldable: No
Kill: Instant with direct hit |
 |
| |
|
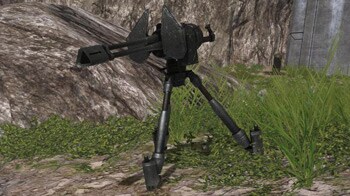
Magazine: 200 Rounds when detached (Infinite
when mounted)
Rate of Fire: Automatic
Scoping: No
Dual Wieldable: No
Kill: Very quick with direct fire to target |
 |
| |
|
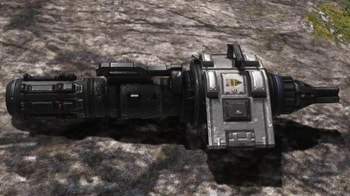
Magazine: 8 Rounds when detached (Infinite when
mounted)
Rate of Fire: Semi-Automatic
Scoping: No
Dual Wieldable: No
Kill: Instant with direct hit |
 |
| |
|
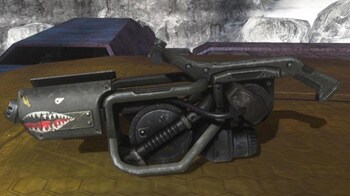
Magazine: 100 Fuel Energy
Rate of Fire: Semi-Automatic (3 second bursts)
Damage per hit: Extreme
Instant Kill with Headshot: Yes (Instant
kill once flame touches the body)
Scoping: No
Dual Wieldable: No |
 |
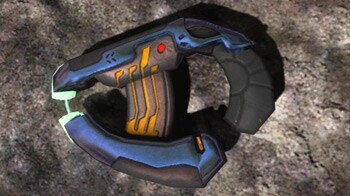
Covenant
Magazine: 100 Energy
Rate of Fire: Semi-Automatic
Damage per hit: Low (Drains shield with overcharged
shot)
Scoping: No
Dual Wieldable: Yes
Kill: Rapid fire to target |
 |
| |
|
Magazine: 100 Energy
Rate of Fire: Automatic
Damage per hit: Medium - Low
Scoping: No
Dual Wieldable: Yes
Kill: Rapid fire to target |
 |
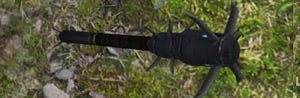
| |
|
Magazine: 100 Energy (10 hits)
Rate of Fire: Low (2-second delay per swing)
Damage per hit: Extreme
Scoping: No
Dual Wieldable: No
Kill: Instant with one swing/lunge |
 |
| |
|
Magazine: 19 Needles
Rate of Fire: Automatic
Damage per hit: Extreme - Low
Scoping: No
Dual Wieldable: No
Kill: Instant if enough needles connect to target |
 |
| |
|
Magazine: 18
Rate of Fire: Semi-Automatic
Damage per hit: Medium
Scoping: (2x)
Dual Wieldable: No
Kill: Instant with headshot to a shieldless
enemy
|
 |
| |
|
Magazine: 100 Energy
Rate of Fire: Semi-Automatic
Damage per hit: Extreme - High
Scoping: (5x - 10x)
Dual Wieldable: No
Kill: Instant with headshot or two body shots
to a shielded enemy |
 |
| |
|
Magazine: 5 Rounds
Rate of Fire: Semi-Automatic
Damage per hit: High - Medium
Scoping: (2x)
Dual Wieldable: No
Kill: Two direct hits to target |
 |
| |
|
Magazine: 200 Rounds when detached (Infinite
when mounted)
Rate of Fire: Automatic
Scoping: No
Dual Wieldable: No
Kill: Very quick with direct fire to target |
 |
| |
|
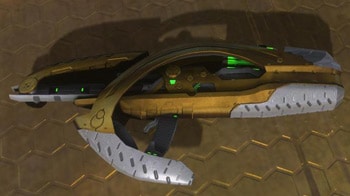
Magazine: Infinite Ammunition
Rate of Fire: Automatic
Damage per hit: Medium
Instant Kill with Headshot: No
Scoping: No
Dual Wieldable: No |
 |
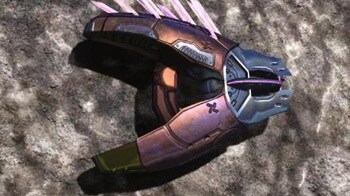
Brutes
One of Halo 3's purposes was to expand the Brute Sandbox.
Only two of four listed below were seen in Halo 2, however,
only the Brute Shot was a useable weapon.
Magazine: 100 Energy (Depletes Energy per swing)
Rate of Fire: Low (2-second delay per swing)
Damage per hit: Extreme - Medium
Scoping: No
Dual Wieldable: No
Kill: Instant with lunge |
 |
| |
|
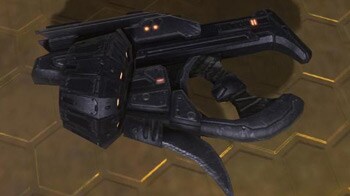
Magazine: 48 Rounds
Rate of Fire: Automatic
Damage per hit: Low
Scoping: No
Dual Wieldable: Yes
Kill: Rapid fire to target at close range |
 |
| |
|
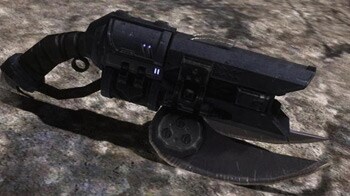
Magazine: 5 Rounds
Rate of Fire: Moderate
Damage per hit: High - Low
Scoping: No
Dual Wieldable: Yes
Kill: Instant with two direct hits at close
range |
 |
| |
|
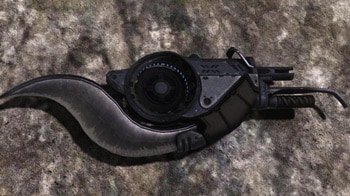
Magazine: 6 Rounds
Rate of Fire: Semi-Automatic
Damage per hit: Medium
Scoping: No
Dual Wieldable: No
Kill: Direct fire to target |
 |
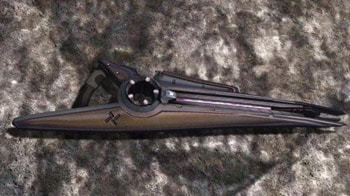
Forerunner
The only weapon affiliated with the Forerunners is
the Sentinel Beam. Whenever a Sentinel is destroyed,
you are able to pick up their weapon from the wreakage.
Magazine: 100 Energy
Rate of Fire: Constant
Damage per hit: Extreme - Low
Scoping: No
Dual Wieldable: No
Kill: Direct fire to target |
 |
Grenades
Halo 3 introduces two, never before seen grenades into
the Halo series, the Brute Spike
grenade and the Incendiary grenade.
Ammunition Limit: 2 Grenades
Damage: High - Low
Kill: Two grenades at close range |
 |
| |
|
Ammunition Limit: 2 Grenades
Damage: Extreme - Low
Kill: One grenade at close range or stuck to
target |
 |
| |
|
Ammunition Limit: 2 Grenades
Damage: Extreme - Low
Kill: One grenade at close range or stuck to
target |
 |
| |
|
Ammunition Limit: 2 Grenades
Damage: Extreme - Medium
Kill: Instant with direct hit |
 |
4 - Vehicles
Halo 3 not only brings back all the vehicles from the
previous game (except the Spectre) but also, introduces
many new ones. Following is a list of all vehicles that
you can find in the game.
This list is seperated into three types: Humans, Covenant
and Brutes
Humans
Armament: (1) Light anti-aircraft gun mounted
on back.
Crew: (1) Driver. (1) Gunner.
(1) Passenger. |
|
| |
|
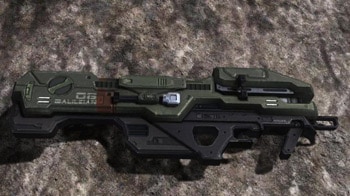
Armament: (1) Gauss Cannon
Crew:
(1) Driver. (1) Gunner. (1) Passenger |
|
| |
|
Armament: None
Crew: (1) Driver.
(4) Passengers |
|
| |
|
Armament: (1) High Velocity Gun. (1) Secondary
Gunner Turret
Crew: (1) Driver and Gunner
(1) Secondary Gunner. (4) Passengers |
|
| |
|
Armament: None
Crew: (1) Driver.
(1) Passenger |
|
| |
|
Armament: (2) Rotary chain guns. (2) Guided
Missile Launchers
Crew: (1) Driver. (2)
Passengers |
|
| |
|
Armament: (1) Light Anti-aircraft Gun. (1)
Heavy Machine Gun (Detachable)
Crew:
(1) Driver. (16+) Personnel
Cargo Capacity:
(6) Mongooses. (2) Warthogs |
|
| |
|
Armament: (2) Missile Pods. (1) Heavy Machine
Gun
Crew: (1) Pilot. (1) Co-pilot.
Cargo Capacity: 10 Passenger Seats.
Complement: (1) Scorpion Tank, or (1) Warthog,
or (2) Mongooses, or (4) Weapon canisters.
Additional Notes: This vehicle is non-usable
and cannot be destroyed.
|
|
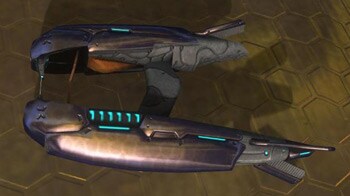
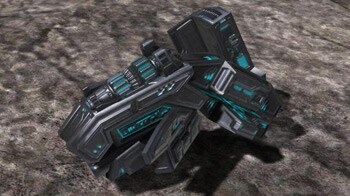
Covenant
Armament: (2) Plasma Cannons. (1) Fuel Rod
Gun
Crew: (1) Pilot |
|
| |
|
Armament: (2) Plasma Cannons
Crew:
(1) Driver |
|
| |
|
Armament: (1) Plasma Mortar (1) Secondary
Plasma Turret
Crew: (1) Driver (1) Gunner |
|
| |
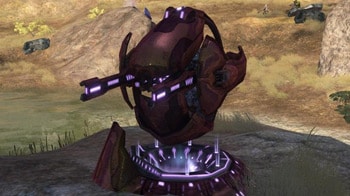
|
Armament: (6) Fuel Rod-based Guns (1) Secondary
Plasma Turret
Crew: (1) Driver (1) Gunner |
|
| |
|
Armament: (2) Automatic Plasma Cannons. (1)
Shade Turret
Crew: (1) Pilot. (2) Gunners
Cargo Capacity: Varied with size of Specie
Complement: (1) Wraith, or (2) Ghosts
Additional Notes: This vehicle is non-usable.
Use extremely heavy weapons to destroy, such as
the rockets of a Hornet or the cannon from a Scorpion
tank. Phantoms with green tops are friendly. |
|
| |
|
Armament: (1) Main Plasma/Energy Cannon.
(1) Large Anti-Aircraft turret. (3) Mounted Automatic
Plasma Cannons
Crew: AI controlled.
Cargo Capacity: Varied with size of Specie
Additional Notes: This vehicle is non-usable.
Use heavy weapons to damage the legs, then board
the tank when it lowers. Once done, head to the
main reactor in the back and destroy that to make
the Scarab tank explode. |
|
Brutes
Armament: (4) Autocannons
Crew: (1) Driver |
|
| |
|
Armament: (1) Mounted Plasma Turret
Crew: (1) Driver. (1) Gunner. (2) Passengers. |
|
5 - Equipment
Equipment is one of the best additions to Halo 3. You
can use equipment is both campaign and multiplayer.
Each equipment has a different effect, but be very careful,
some equipment that you use can hurt you.
Campaign and Multiplayer
| The Bubble Shield is just what it says, a shield in the shape of a big bubble. Anyone on any team is able to enter and leave the bubble shield, but bullets, rockets, plasma, etc is prevented from entering or leaving the bubble. The bubble shield however, does not stop vehicles from entering or leaving. This piece of equipment is perfect is you have a Shotgun or two Maulers. Try throwing a grenade and leaving the bubble down if you see someone charging in on you. You can also destroy the shield itself from the inside. |
| |
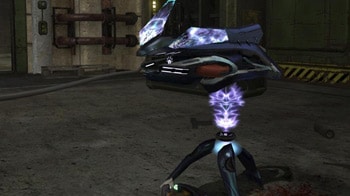
| This handy equipment is perfect for flushing
out enemies or if you are out-numbered. If someone
is in the effect-radius of the Power Drainer, their
shields will near-instantly drain (overshields as
well be careful if you have one!). But be aware,
if you use the Power Drainer, it doesn't mean that
you are immune to it's effects. Perfect if you know
someone is coming up a lift, use the Power Drainer
to deplete their shields then easily finish them
off. |
| |
| The Trip Mine is a good peice of equipment.
If you see a vehicle charging at you, deploy the
Trip Mine at the last second to damage it, however,
the Trip Mine will not destroy a vehicle like a
warthog, it will not even kill someone who walks
over it. |
| |
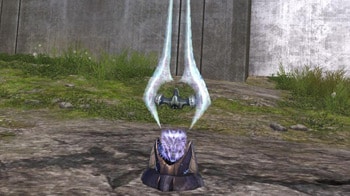
| This is the perfect tool to get to those
high-to-reach places. If you can't reach it, use
the Gravity Lift to help you "boost" your
way up. Once deployed, the Gravity Lift produces. |
| |
| Perfect for those times when you don't
want your enemy to know where you are. The Radar
Jammer will make your motion sensor useless by filling
it with what seems like many hostile contacts. This
is also useful at times when you are running away.
If you deploy the Radar Jammer as you turn a corner,
then another corner, your follower will not know
where you have excaped to. |
| |
| The Flare is to be used to blind anyone
you want. If you deploy the Flare, anyone looking
at it during it's short life-span will become blinded
by it's light. A good tool if you know where you're
shooting at, but the enemy does not. |
| |
Another shield, great for those "duck
and shoot" moments. The Deployable Cover will
provide a large shield where you can take cover
behind. Unlike the bubble shield, you cannot walk
through it, and it only covers one side of you.
There is a "slit" in the center of the
shield where you are able to fire small arms through.
|
| |
Perfect for those sniper positions or
when you see that you are out-numbered. While in
the effect-radius of the Regenerator, your shields
will rapidly replenish, making you much more difficult
to kill if not impossible with small
arms fire. |
Campaign Only
Remember playing as the Arbiter in Halo
2? Did you like the cloaking feature? Well now you
can have it back as the
Chief if you find one of these lying around. Cloaking
will make you invisible unless your enemy is up
close, or has
extremely good eye sight. |
| |
Very simple to explain, once activated,
Invincibillity will make you invincible for a short
amount of time. Make good
use of it, because not only does it deplete quickly,
but the only way to obtain one is to kill a Brute
Cheiftan before he
uses his own. |
| |
These handy little turrets are great
to hide behind. Similar to the weapon system of
the Sentinel Beam, these turrets
will fire upon any nearby hostiles until destroyed. |
6. Hints & Tips
Campaign
Requirements: Battle Rifle/Carbine and lots of patience.
All you have to do is eliminate the secondary gunner and then stand on top of the driver. Bash open the hood (melee) until you can see the driver. Then melee the Brute until the helmet is gone (or if the helmet is not on the Brute, then do not melee).
Now comes the hard part. You have to wait for a spot where it DOES NOT give you the option to board the enemy Wraith (Hold RB...) So for the split second that this does not show, hold RB and shoot the Brute in the head (while still holding RB). You should now board the Wraith once the Brute is dead.
If you were not holding RB while you killed the Brute, the Wraith would most likely explode.
Also, if you get out of the Wraith, it will explode, not allowing you to enter it again.
Last level, on Legendary difficulty. Instead of driving forward with the Warthog, go backwards and keep going until you can take a left turn. All the way in the back should be a Mongoose.
To find a Chopper, go straight with the Warthog until you can take a left, it's before you reach the exploding squares.
And to get to the ghosts, as soon as you exit the control room after you defeat 343, take a left instead of going up the ramp and you can see some ghosts underneath the stairs.
If you have not noticed yet, the Brutes with the large red headdresses are the only characters in the game who carry the rare invincibility equipment. Therefore, if you wish to obtain one, you have to kill the Brute before he activates his own. Meaning you have to kill him very quickly, because he will use it if you hurt him enough and after he starts charging at you.
Also, once you have it, save it for when you need it because it is very effective, yet it only lasts a few seconds.
Grenades don't always have to be the bad guy when you throw them at your feet. In fact, these helpful tools can help you gain that extra height. This tactic is extremely helpful in campaign. All you do is throw a grenade at your feet, jump and crouch in mid-air. The explosion from the grenade should give you an extra boost.
Standing on friends' head is very helpful if you are trying to get out of a map or explore something that you easily can't get to. If you cannot get your friend up after you get to the desired position, try to have your friend kill his player and hopefully he will respawn close to you.
At the very last leg of the last level, right before you go down the last ramp to jump into the frigate, you can see a rock archway to the right. On the other side of that is a small path which will take you to a Grunt who has something quite funny to say.
After you clear the area of Covenant when the Pelican flies off and crashes on the first level, head into the jungle and eliminate all the Jackals. Now back track your steps and get to the place where you first entered the jungle, from there you can make your way left, all the way up and across to the other side while hugging the left wall. Eventually, you should see a family of monkey things sitting there that you can't kill…sadly.
In the level Crows Nest, before you reach the hanger, as you go down the long hallway, continue going down instead of taking a left into the doorway. At the end is a Marine talking to another Marine on the other side of the door. The voices of these Marines are from the people who made the popular Red Versus Blue Machinima.
What? The Master Chief is…dead? This can't be…after all we've been through…after all the Covenant blood we have spilled!! WHY BUNGIE WHY!!!
But wait! You can see that there is a cut scene after the credits, which shows the complete opposite. It shows that the Arbiter and everyone on Earth believes the Chief is dead because his part of the ship did not make it through the portal while leaving the Ark. Supposedly the portal collapsed and cut the ship in half.
If you just beat the level on legendary difficulty, there is yet another clip right after this one…just a few seconds long, but it's cool.
On the last level, you can find a two-dimensional
figure bobbing up and down. To get this, you need
help from a friend via split screen or Xbox Live
to cross the large gap and second small yet narrow
gap. To find this, simply take a right instead of
a left next to the terminal before you reach the
flood. You will immediately see the first gap. Good
luck getting to it though.
Right after you destroy the Scarab on the level
The Ark, head into the room as normal. Once
you're in the room with all the sleeping Grunts,
you can see a Brute peeing in the back corner.
This one is extremely hard to get to and requires
team work. So if you go to the last level and the
area where the terminal is (terminal eight) take
a right instead of a left. To the right, you can
see a dark chasm of death. On the other side somewhere
over there is a man bobbing up and down.
On the level Crows Nest as you're making your way
to the hanger for the first time, keep going down
the long hallway instead of left into the door way
and all the way down there is the easter egg.
You can also find the word 'Puma' written on the
tire of any Warthog if you look closely enough.
Multiplayer
Similar to "Grenade Jumping", crouch jumping is another useful tactic, especially in the multiplayer field. All you have to do is jump and hold the crouch button. This will give you that extra clearance and when you pull of this amazing feat, your friends will be shocked and worship your feet in order for you to tell them how you did this. Some of that was a lie.
If two people are in a quick unfriendly exchange of ammunition from weapons, and both can be killed by one melee hit, it does not matter who strikes first, because whoever has more health will win (assuming the person who struck second yet had more health struck a split second later or so). Bungie supposedly implemented this system to avoid more "host" problems. However, this seemed to have decreased because of the first auto update for the game. Now, you will see less of the above, and more of both people dying.
And yes, the melee in Halo 3 is too strong. It takes two strikes to kill a fully shielded enemy. But it also takes two sniper rounds to the body (or the toe) to kill a fully shielded enemy. This can get very frustrating at times when you think you can kill someone by spraying them with your Assault Rifle when they actually kill you by using a melee.
Nah, not really broken, well, compared to Halo 2 maybe. All that really happened was that there is no lock on feature for the rockets in Halo 3. Good thing you never really used the rockets anyway huh?
But to supplement, there is now something called the "Missile Pods" which lock on automatically. Refer to the weapon section of this guide for more information on these.
Well, yes, the Energy Sword is…different from the Sword in Halo 2. In Halo 3 it takes about two seconds to switch to it. In addition, the lunge distance has been dramatically decreased. This has been implemented in the game to make the weapons more balanced, because if you played Halo 2 Multiplayer, I am sure you hated it when someone was charging at you and suddenly pulled out an Energy Sword and killed you from 50 miles away.
Not too much of a change, it is just that there is now a slight delay in between each shot. So adapt or ie…mwahahahaha.
If you are inside a Bubble Shield and you see someone running towards you, try throwing down a grenade at the last second then leave the Bubble Shield. If you timed this right, the grenade will explode next to the person who ran in the shield.
You can also use this tactic if you know that someone is coming around a corner. Throw down a grenade while keeping a close eye on your motion tracker and hopefully the person will turn the corner with an exploding grenade in his face.
Finally, sticky grenades are useful if you can aim. Use can use the tactic called "suicide stick" where you charge at an enemy who you know will kill you, but at the last second you stick him with a Spike or Plasma grenade.
The Energy Sword and the Shotgun will usually beat a Gravity Hammer if both strike/fire at the same time. Therefore, if you have a Gravity Hammer, do not charge someone who you know has an Energy Sword or a Shotgun.
When it comes to the Shotgun and the Energy Sword, usually the Shotgun will take down the Energy Sword, but occasionally I have seen it the other way around.
However, do not forget that two Maulers will take down anything else, shotgun, sword…everything.
So overall, two Maulers or the Shotgun are the best close range weapons you can find.
Not true, however, rockets are generally slow to fire, but very deadly. Therefore, when you are trying to take down a lone person with the rockets, try to anticipate where he will walk to or jump to, especially if he is already shooting at you. This means that sometimes, you will not be shooting directly at them, but where you think he will be when the rocket reaches them.
Using the Spartan Laser to take down a single person can sometimes be difficult, especially if the person is moving. Therefore, a good thing to do while holding the Spartan Laser is to constantly charge it repeatedly, especially while walking around. If you do this, you may get lucky enough to spot an enemy while the Laser is almost fully charged, therefore making it easier to get that kill.
Well, invisible on the motion tracker at least. If you are crouched while walking, you will not show up on anyone's motion tracker. This is a great tactic for those times where you have to sneak up on your enemy. Also if you use this hack while on Xbox Live, flaming ninjas will come to your house and take your Xbox away as punishment. Part of this is truth. Another part of it is a lie.
With on overcharged shot from a Plasma Pistol and a successful hit, a vehicle will be stalled for a few seconds, similar to the effects from a Power Drainer. This will not stop the weapons from working. So if you stopped a Warthog, do not charge at it thinking the person in the turret cannot do anything.
Keep in mind however that the overcharged shots from said Plasma Pistol do not track targets as well as in Halo 2. So unless your target is dead ahead of you, do not bother trying to stall a vehicle. This brings us to the next part.
This is correct. An over-charged shot from the plasma pistol can hardly track on anymore, like it did in Halo 2. Unless the target is straight ahead of you and not moving left or right, hitting the person with said shot will be quite difficult.
Along with less accuracy, the battery drains quickly while holding a charged pistol.
Halo 3 is a much more balanced game than its predecessor, Halo 2. By balanced, I mean less glitches and the works. There are no more super bounces and no more weapon glitches, such as the BXR, BXB. So if you depended on these while playing Halo 2, good luck with this game.
Ever wanted to get into the upper room on The Pit with a Sniper Rifle on Team Slayer? Well now you can. All you have to do is grab a Sniper Rifle and a Brute Shot, then go to the lower window area. Look down while aiming the Brute Shot to the ground. Crouch jump up and immediately fire three shots at the ground. This (if done properly) should boost you up to get into the upper room.
This tip is kind of only helpful while playing Team Swords. Regardless, when wielding an Energy Sword, charge at your enemy with the intention to attack with the red 'B' button. Although there will be little or no lunge, if you are quick enough, you will be able to block the other person who lunged at you with the 'RT' button and using an Energy Sword.
If you swing with 'B', you will be able to swing again right after that. However, if you swing with 'RT', you will have to wait for two or so seconds to swing again. Therefore, if you clash with the person who used 'RT' and you used 'B', you will be able to swing again and kill your enemy quickly.
While playing matchmaking, it is imperative for your team to have at least one power weapon. If one team controls all of the power weapons, then the game is lost. Therefore, the first requirement is to know where these weapons spawn in the map, and know where you are once a game starts. Once it starts, rush to the nearest power weapon and claim it for yourself, vowing to kill anyone who attempts to put their greasy paws on your weapon.
In the Forge, you can set objects to respawn based on the number of that item being on the map by pressing 'X' on the item twice and selecting the option in that menu.
An example is that I have five fusion coils on High Ground. If I set the number up to five (pressing 'X' twice) that means that fusion coils will respawn if there are less than five on the map. Therefore, they will continuously respawn as they explode.
So, make a big pile of explosive items, vehicles, and whatnot. Then set all of the item properties to instant respawn, or in this case to respawn if the limit on the map drops below a certain number, (the total number currently on the map).
Then add a grenade to the big pile and watch the continuous explosion. Try not to make it TOO big however or it might get a little laggy.
This works best if you place all available fusion coils and plasma batteries inside the Elephant on Sandtrap, and then make them explode. Because they will respawn instantly, they will explode constantly making the Elephant fly around the map.
If you ever manage to flip an Elephant on the multiplayer map Sandtrap, you can find an odd message when you try to flip it. "But I can't flip the Elephant!!!" Try going into Forge and place a whole bunch of plasma batteries and fusion coils next to the Elephant. Then add a grenade to the equation and see what you'll get.
On the multiplayer map Standoff, you can find another
two-dimensional figure standing on one of the large
satellites in the background. Also, if you are able
to get out of the map, you can find a sketched-in
face on the lower right hand side of the moon.
If you use a sniper rifle or perhaps the zoom feature
on the saved film feature, you can see a man standing
on one of the satellites in Standoff. It is also
possible to get "out of the map" and get
a better view of the person.
I did not personally confirm every single detail for every single hint and tip. Therefore, if there are any errors, please contact me immediately and let me know where exactly the error is and what should be placed instead.
|