|
September 22 / From 12:15 PM / All is Lost
A cutscene will play after the credits and after you
have saved your game that will pick up where Ending
A left off. This mode is also accessible from the main
menu screen if you achieved Ending A.
September 22 / From 8:00 PM / What if...
|
|
After the cutscene with Isabela, you will have to run
throughout the mall and collect eight items to help
Isabela in formulating a suppressant for Frank's zombification.
The items will be labeled with a blue key mark as you
approach them. Many of the zombies in the mall are dead,
except for the ones in Leisure Park so the coast will
almost be clear. As you enter North Plaza, however,
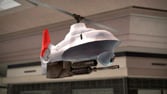
you will be introduced to a new enemy as a cutscene
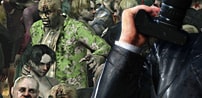
plays. These helicopter drones will set off an alarm
if they spot you and they will fire their machine gun.
The alarm will call in Special Forces soldiers from
around the area so your cover will be blown for that
area. Use a gun to take the drones out quickly whenever
you spot one and be sure to listen for them as you move
out from around a corner. A Sniper Rifle or a Machine
Gun works very well for the drones. Stealth plays a
vital role in this little item run since Special Forces
soldiers will be all over you if you constantly stay
in the open. Some of them will have their back turned
so you can get the drop on them if you sneak up from
behind. You don't have access to the Small Chainsaw
anymore unless you still have one from 72 Hour mode,
so you will need to grab either a Machete, Meat Cleaver,
Mannequin Torso, Katana, or Battle Axe to hack through
the soldiers. The good thing about the Mannequin Torso
is that it will usually knock down a soldier with one
hit and it's available all over North Plaza. Be sure
to use Frank's Lift Up, Face Crusher, and Disembowel
moves for one hit kills on the Special Forces soldiers
also.
If you are starting Overtime Mode without playing the
previous 72 Hour Mode, then you will start with nothing,
but if you are starting directly from 72 Hour Mode then
you will keep any weapons that you had as that mode
ended. Be sure to save your game while in Overtime Mode
in order to keep your leftover weapons from 72 Hour
Mode. Luckily, you start out next to Huntin' Shack,
so you can go grab some good firearms right from the
get go. Suit up and move out! Keep in mind that a machinegun
will help you out more than a shotgun at the moment
though. Be sure to grab some Katanas from Ripper's Blades
and Mannequin Torsos on your way to the supermarket.
Stock up on them since you can kill a Special Forces
soldier with just a few hits from each weapon (depending
on your attack level) compared to several shots from
a machinegun.
Store: Seon's Food & Stuff
Section of Mall: North Plaza
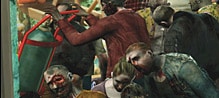
The Special Forces soldiers in here will be very hard
if you take them all on while they are grouped. Run
along the aisles and defeat them individually with a
Katana or Mannequin Torso. There are plenty of food
items so run and grab a bunch for your journey ahead
- stock up on milk. The FIRST AID KIT you seek is in
the Pharmacy next to where you got the medicine for
Brad. Open the door near the back of the supermarket
and run down the corridor. Look on the shelf to the
right as you enter the Pharmacy to find the first aid
kit near the back. Get on the motorcycle outside of
Seon's Food & Stuff and drive to Wonderland Plaza.
Store: Wonder Jewels
Section of Mall: Wonderland Plaza
One Special Forces soldier will be inside of Wonder
Jewels. Grab the MAGNIFYING GLASS on the register counter
in the back. Drive to the Food Court next.
Store: Frozen Dreams, The Bean Shop, Columbian
Roastmasters (both), Colby's Movieland
Section of Mall: Food Court, Al Fresca Plaza,
Paradise Plaza
The BLENDER is in any store that had one in 72 Hour
Mode. Look in the Food Court, Al Fresca Plaza, or Paradise
Plaza. If you still have the motorcycle then run over
the Special Forces soldiers for an instant kill then
grab one of the blenders from the Food Court. I would
recommend going through Leisure Park to enter Paradise
Plaza since Al Fresca Plaza is full of Special Forces
soldiers. Do not activate the cutscene near the clock
tower of Leisure Park yet. Stay away from the clock
tower or you will have a helicopter to deal
with! Either way that you go, you have to ditch the
motorcycle.
Store: Sportrance
Section of Mall: Paradise Plaza
Check on the second floor, bottom shelf of the right
aisle to find the COLD SPRAY. Leap off the first set
of railings in Columbian Roastmasters and grab the Katana
on the orange awning below the railing if you're running
out of weapons.
Store: Cam's Cameras
Section of Mall: Paradise Plaza
Check behind the register counter to find the DEVELOPING
SOLUTION.
Store: Security Room
Section of Mall: Paradise Plaza
Make sure to have one fully loaded machinegun before
entering the warehouse. This is one of the few areas
where the machinegun that the Special Forces drop will
actually help to defeat some soldiers. Two Special Forces
soldiers will have their back turned as you enter the
warehouse. Quickly step out from behind the wall and
start blasting them with the machinegun. Keep hitting
them until they die, then spray the others with bullets
as they drop from the tall racks in the back. When they
get too close, step back behind the wall and equip your
Katana, then step back out and charge them with your
Katana. You shouldn't receive much damage this way.
You can also, go through the Security Room door on
the second floor in Entrance Plaza and go straight to
the Security Room without having to go through the warehouse.
If you do this then get Items #7 and #8 before this
one then enter the Security Room from Entrance Plaza.
It's your choice.
The coast is clear on the roof and in the Security
Office. The COFFEE FILLERS are on the shelf under the
security monitors in the office area. Be sure to save
your game if all is going smoothly. If you go through
the warehouse again, take the elevator down and then
just slice through the soldiers below on your way out.
Make a run for it if the others on the tall racks come
after you. I would advise you to go through the once
welded door in the Security Room and head straight into
Entrance Plaza though.
Store: Estelle's Fine-lady Cosmetics
Section of Mall: Entrance Plaza
One Special Forces soldier will be hiding in the store
so kill him and grab the PERFUME BOTTLE off of the left
side of the middle display.
Store: Sports High
Section of Mall: Entrance Plaza
Check on the third small aisle as you enter Sports
High to find the CAMP STOVE on the bottom shelf. One
Special Forces soldier is in the store, but some more
may join him from behind.
After you have gathered all the items, return to Isabela
in Carlito's Hideout at the North Plaza. Talk to her
for a cutscene. Talk to Isabela once again after the
cutscene to get another mission.
Store: N/A
Section of Mall: Leisure Park (Clock Tower)
Isabela cannot do anything without the power from a
generator. Luckily, there is one on the Clock Tower
of Leisure Park. Make your way to the middle of Leisure
Park for a cutscene. Look for the helicopter wreckage
to find the Clock Tower. A helicopter will attack after
the cutscene. The GENERATOR is on the back of the Clock
Tower, so grab it and run back to Carlito's Hideout
in the North Plaza before the helicopter has a chance
to blast you too much. Run in between the trees and
stay under the rooftops as much as possible while running.
When you get to Carlito's Hideout, talk to Isabela once
more while you have the Generator.
September 22 / Preparation of the Suppressant
You'll likely be reaching the 12-hour mark of Overtime
Mode by now. Once this time is reached, Frank will start
to feel pain from his infection and will start to grab
his chest in at times like he is having a stomachache.
He will drop his currently equipped weapon and will
be vulnerable. He will only do this a few times, but
it will come randomly.
Talk to her again afterwards to find out that she has
everything prepared now, and all she needs is some adult
Queens from the zombies. She needs a total of 10 QUEENS.
Enter North Plaza to find out that the place is now
overrun with zombies once again. I bet you're glad to
see them instead of soldiers aren't you? Well, I hate
to burst your bubble, but the Special Forces soldiers
and drones are still in the areas, so you're still going
to have to deal with them. To find the Queens, you are
going to have to find them the same way as you have
throughout the whole game and find them through random
zombies after you defeat them. All the zombies in Leisure
Park are now dead thanks to the helicopter, so don't
go back there. Grab plenty of Katanas from Ripper's
Blades, and get the Weekly Photo Magazine from Contemporary
Reading in Paradise Plaza then head through any of the
entrances labeled on the map that go to the Maintenance
Tunnel since that is where you will find tons of zombies.
The entrance in Paradise Plaza is near the restrooms.
While you have the Weekly Photo Magazine with you, look
for any zombie that is waving its arms in the air and
has a green PP icon over its head signaling an Outtake
shot. These are the carriers of the Queens. Kill them
with your current weapon or with a car and grab about
five Queens or all ten if you can carry them. Return
to Isabela and give them to her by equipping each one
and pressing the B button near her. You can make as
many trips as you need to. Before you give all 10 Queens
to her, it would be best to grab plenty of healing items
and a few good weapons since this is the last chance
you will have to stock up on items in the mall. Grabbing
a few extra Queens beside the 10 that you give to Isabela
would be a good idea. Give all the Queens to Isabela
for a cutscene that will lead to the next part.
September 22 / A Way Out
Isabela has made a type of anti-zombie pheromone that
will keep the zombies away from you. There is a save
point at the beginning of this area, so save your game
then drop down into the zombie horde below. A Queen
will help you out greatly in this area if you have one
by any chance, but you can still manage without one.
Take Isabela's hand and lead her through the zombie
horde. Make sure that you keep her by your side while
you can. The zombies will bounce away from you both
as they come into contact with the perfume - this does
not mean that you are invincible however. The zombies
can still hit you sparingly and can nearly knock you
away from Isabela. Walk around the area and grab some
rocks if you don't have any weapons. Walk up to the
large gate ahead that is sealing off the tunnel. There
is a barred circular tunnel to the left side. You will
need to move over to the barred tunnel and lift up the
bars so Isabela can get through. The "Open"
command will appear while next to it. While Isabela
is crawling through the tunnel, Frank will have to fight
off the zombies the best way he can. Beat them with
rocks or use some double lariats to knock them back
until Isabela turns the valve handle on the other side
to open the gate then rush to her side. Grab her hand
and walk deeper into the tunnel. Soon you will come
upon a raised area with a pickaxe on top. Maneuver through
the zombies until you come to another big gate. Move
over to the right side of the gate until you see a gate
door then let go Isabela's hand so Frank can open the
door.
Grab Isabela's hand and move down the next tunnel.
Walk over the crumbled debris ahead and keep moving.
Look for any open spots in the hordes of zombies and
run through them to keep you safer. Another gate will
block the way up ahead once again. Move over to the
barred circular tunnel on the left side just like before
and let go of Isabela's hand then lift up the barred
gate so she can get through. Fight off the zombies and
wait for her to turn the valve handle on the other side
to raise the gate. Grab Isabela's hand then run down
the ramp ahead. Keep running until a cutscene starts.
Save your game then grab Isabela and carry her on Frank's
back into the zombie horde below. You will have to fall
off the platform with her if she doesn't jump off herself.
Grab her again then work your way down the left corridor
on the side of the gate up ahead. Move down the corridor
and turn to the right then climb the stairs. There are
some Special Forces soldiers on the other side standing
guard at the gates. Do not move past the side gates
or the Special Forces on the other side will shoot at
you. At the top of the stairs,
put Isabela down then pull the switch to open all three
gates below and unleash all the zombies on the Special
Forces soldiers in the middle area. Grab Isabela and
head through the gate next to the stairs. The soldiers
are occupied at the moment, but their number one priority
is still Frank and Isabela. They will most likely shoot
at you a few times but just keep running. Run over to
the jeep in the back and get in to initiate a cutscene.
Isabela must be next to Frank in order to get inside.
Use double lariats to get the zombies off if you're
separated from Isabela.
September 22 / The Final Stand
Boss - Prototype Tank
You are now put behind the gun on the back of the jeep
as a prototype tank chases Frank and Isabela through
the path ahead. Aim at the two blinking areas of the
tank above its tracks and fire away at them. Pick one
side and keep blasting it. The tank will lose sight
of you as it slows down from the damage and will miss
when it shoots if you keep firing at the sides. The
tank usually gets stuck behind an obstacle when it fires
if you hit the sides properly. You can also shoot the
small sensor with the laser that pops up on the top
of the cannon to make it stop tracking you. This will
cancel the tank's cannon shot. Eventually the blinking
area on the sides will blow up if you keep hitting one
side. Keep firing at one of the sides to keep it at
a distance and fire at the sensor if it gets too close
while readying a shot. The tank will send out helicopter
drones and heat-seeking missiles as its life meter starts
to fall. Shoot the missiles and helicopter drones before
they can do any damage. As long as you have a steady
aim this part shouldn't be too bad.
Psychopath Boss - Brock
[PHOTO OP] When he lifts his left arm in the
air and poses.
Brock is definitely the most defensive boss you will
fight in this game. For this fight, you must battle
Brock with your bare hands while on top of his tank
as a horde of zombies surround the tank from all sides.
All of your items are gone for this fight. The space
around the area is severely limited so it is easy to
get knocked off. If Brock manages to hit Frank then
Frank will get stunned - this will lead to Brock being
able to knock you off the tank with a heavy hit. When
you fall off, you will land in the middle of the zombie
horde surrounding the tank and they will start to grab
at you even before you have time to get up. When you
do manage to get up, use the Zombie Ride to step over
the zombies and get back on the tank. Brock can actually
knock you off the tank even after you fall down on top
of the tank so you must not let him hit you much at
all.
You can't simply hit Brock by running up to him and
punching him. You have to wait until he does an attack
that will leave him open then counter with a series
of punches or a double lariat. His attacks include punches,
a roundhouse kick, a choking grab, a punt kick (while
you're on the ground), and a ram. He will always pose
right before he rushes in for his grab so be ready to
move. If he catches you, shake the left analog to break
free from his chokehold. You will have to step to the
sides as he begins to attack then counter him from behind.
The best time to hit him is right after his ram. He
will usually perform a ram right after a roundhouse
kick. Do not counter him immediately after the ram or
he will block. You must wait a few seconds for him to
rise up then counter and you will be able to hit him
every time - this is the main key to beating him. The
double lariat works perfect since it takes a while to
run over to him and do the combination, so he will be
open to an attack by the time you get it off. It will
not take that many hits to defeat
him. Finding an open spot will be the main challenge
for the battle, but once you understand the timing he
is not as hard as he seems.
The ending cutscene for the True Ending will play after
the battle and the credits will roll...again. |